
Andy Millne
Invision Community Team
-
Joined
-
Last visited
Everything posted by Andy Millne
-
-
Yes, we're not going to leave people without options. If our API requires changes we will make them to better support the 3rd party alternatives.
-
Thanks, it's some of my best work 😂 Not really though, I'm happy to take the credit but this one was @Matt Finger and @Matt
-
 You may have noticed many of the Invision Community apps getting updates recently. Over the last several months we have revealed revamped Events, Gallery and Downloads apps and have listened to how you have been using them. As a result, we are including some further app refinements as a direct result of that feedback. Gallery Many of you asked for more customisation options with the new overview page so 🎉 it is now possible to hide and show different sections of the overview using simple toggle settings without the need for theme edits. You can also adjust the number of items that show. Searching for existing Gallery images to include in topics has been a feature of Invision Community for a while but previously search has been limited to the image name. Now, when searching for images via the "Insert other attachment" editor option, searching by album name returns images from that album. Gallerysearch.mp4 Events We added a similar improved overview to Events in the October release but for those of you with multiple Calendars you wanted a quicker way to subscribe to all events. It is now possible to subscribe to all events from a prominent button in the header of the overview page. Members can subscribe to an iCal feed or download an export in just a couple of clicks. Clubs We also decided to use this release to add a couple of updates to clubs. The popular “Mark solved” functionality is now available directly in your clubs with control over who can mark the item solved. You can allow the topic author to mark questions as solved or leave it to moderators only. …and last but not least we added a contextual search tweak so that when members are viewing a club, the search filter defaults to “This Club” We hope these small but useful improvements are popular in your communities and we look forward to hearing more of your feedback and requests. Is there anything we missed? Let us know in the comments. The features discussed in this announcement are available in both Invision Community and Invision Community Classic.
 -
:D
-
Are there any other services supported beyond Zoom for Live Topics?(Jump to the answer in the video)
-
Some of us are following with interest and have seeds of ideas but nothing fixed yet.
-
 Humans are visual beings. Images attract our attention, can communicate ideas faster than the written word and can trigger meaningful discussions. At Invision Community we recognised this very early in the company history and have included a Gallery application for many years. During this time online communities have evolved substantially so we thought it was time to re-assess what it means to offer a community gallery and have some exciting developments to share. Visual Refresh The first thing we wanted to do was to give the look & feel a modern overhaul. @Ehren has done a fantastic job with modern design ideas. We took inspiration from the recent overhaul of the Events app and included a brand new Gallery overview page. This view better highlights featured and new images but also brings recent image comments in to focus to promote discussion. Better Video Support Video support has been included in Invision Community for a while but browser support has varied wildly. This often led to a poor experience where viewers were prompted to download plugins or forced to download the video in its entirety. Browser support for MP4 playback has moved on however and we have been able to update Gallery with some new functionality. Frames from the video can be extracted for the preview thumbnail automatically. We have retained the option to upload a separate preview image however for people that want manual control over the image shown. Skipping ahead in videos is now also supported without the need to download the entire file or use plugins. For communities that are able to leverage our cloud platform non MP4 videos will be automatically converted to support these features. Searchable Image Contents Another benefit for Cloud Communities is images can now be optionally analysed to make their contents searchable. For example, if an image of a tree or woodland scene is uploaded, this would previously only be searchable if the title or description of the image contained specific words or phrases. Now images can be identified solely by their visual contents. NSFW (Not Safe For Work) Invision Community contains tools to automatically moderate sensitive images to prevent them being posted. Some communities with more mature audiences may wish to allow these to be posted however but with some protection. We have therefore added the ability for images to be optionally set as NSFW when uploading. This will cause images to be blurred until the viewer opts in to viewing them. Performance & Usability Images by their nature can be slow to load (particularly on mobile connections) so we took some time and removed lots of redundant javascript and CSS. Where appropriate we have also added support for prefetching the next and previous images in an album or category and lazy loading is handled by the browser natively. We combined this with an improved image navigation experience using an image carousel when viewing individual images and removed the confusing Lightbox overlay. The Lightbox is now used solely for full screen image previews without the visual clutter of comment counts and other meta data. These changes are the start of further Gallery improvements to come and as always we will continue to develop based on your feedback. Let us know what you think in the comments.
 -
 Last month we introduced some powerful updates with a long overdue overhaul of community events. We were very pleased by the excellent feedback received and enjoyed hearing your suggestions. We listened and have been working hard to bring some further updates to Events. Support for more streaming platforms When creating a virtual event in your Events application, you may include a link to your event and the platform will advertise it with the vendor’s logo so your community knows what to expect. When your members are ready to join, choosing the “Open Event” button will set them on their way. With this update, a total of 14 third party streaming platforms are now supported. Zoom YouTube EventBrite On24 Facebook Google Webex Slack Discord Microsoft Teams TikTok NEW! Twitch NEW! Vimeo NEW! SpotMe NEW! Unobtrusive location prompts When viewing the list of events, Invision Community would immediately prompt the user for their location. Your feedback suggested this was too intrusive and as a result members can now opt-in with the “Use my location” link and checkbox. If members do not opt in then their approximate location is used based on an IP address lookup. If neither of these options are available the results center on a default location that you can set in the admin control panel settings. Bug fixes As well as these changes we have also fixed a number of bugs including: A longstanding issue where event times could show incorrectly when members in different timezones edited events. Better localization to make sure all phrases are translatable. Some issues showing events in regions that use commas instead of periods for numbers. Hiding online event links after the event has passed. We still want to make further improvements to Events and are looking forward to more updates in 2023. Let us know in the comments how you are using Events to bring together your community online and offline.
 -

-
The new features of free puppies, unlimited sunshine and good fortune for all will have us jumping in delight.
-
 For a very long time Invision Community has allowed community owners to choose how open or private their communities should be. Communities could optionally allow guests to post without registering, they could allow the use of pseudonyms or they could require the use of real names. This covers a diverse range of communities but feedback from our clients made us realize that some use cases have not been accounted for. For some types of community, where discussion topics are particularly sensitive, community owners want to make sure that members register with their real details but are given the option to post anonymously where appropriate. For example, organisations dealing with abuse or sensitive topics might want the member to feel safe and disinhibited to post info without fear of being identified by the rest of the community. With our next release, we are pleased to introduce Anonymous Posting to make this a reality. When enabled, members will see the option to post anonymously when creating or replying to content. Starting a new anonymous topic Author details for anonymously posted content is hidden throughout the community and instead a default profile picture and name is shown. Total anonymity is not always desirable however and in some cases it may be necessary for trusted staff members to know who posted the content. Where allowed, these staff members will be shown an option to reveal the content author. Author details are hidden but can be revealed by trusted staff members Anonymous posting can be enabled on a per group basis and also limited to specific forums, albums and categories etc. The ability for staff members to reveal who really posted the content is a moderator permission. We hope this new feature is a useful addition and where appropriate makes your members feel safe or comfortable to share info they might not have otherwise. How open or private is your community and what do you find are the benefits or disadvantages of anonymity?
 -
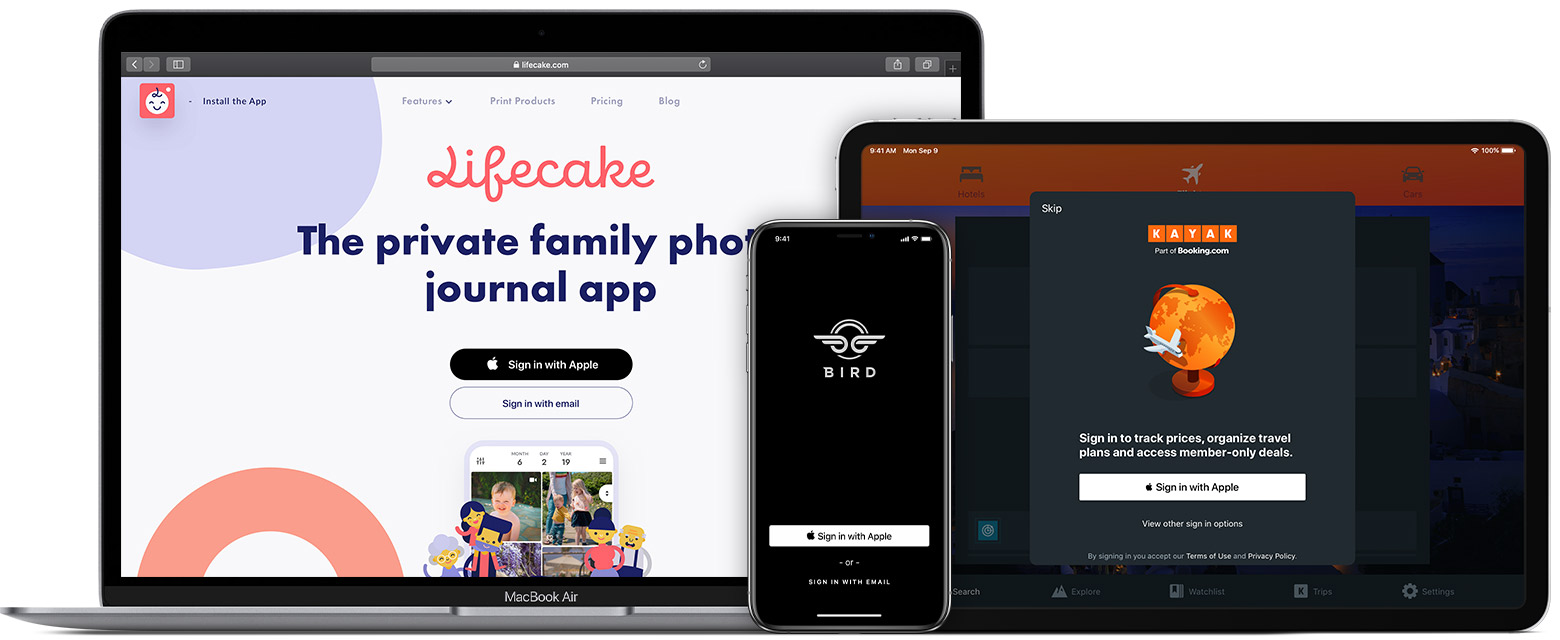 Since the feature was announced at last year’s World Wide Developer Conference (WWDC) we have received lots of requests to implement Sign in with Apple in Invision Community. We’re pleased to announce that as of 4.5 this is now available. You will need a paid Apple developer account to use it but once enabled users will be able to sign in using their Apple ID and all the convenience that brings. Touch ID and Face ID is supported natively where available and works across all your devices. Choose to share or hide your email address Isn’t it just another login button? Sign in with Apple is built on similar technologies as other login buttons such as those already available in Invision Community from Facebook, Google and Microsoft. The difference is Apple’s unique focus on privacy. On certain community types users can be reluctant to sign up when they fear they need to disclose lots of personal details. Every community is different so allowing your users to share as little or as much info as they like could be important to your success. Apple have stated that no user tracking will take place in contrast to other services where this forms a part of their business model. When signing in with their Apple ID the user can choose whether or not to share their real email address with your community. If the user chooses to hide their email address then your community will receive a relay email address that will forward to their real address. The email address used is unique to your community so the user can retain control. Can users link their existing Invision Community accounts? Yes! If a user signs in using the Apple button and shares their real email address, then providing they already have an account on your community they will be prompted to link their account in the same way as other social login buttons. They can also link an existing account from their account settings. If linking from account settings then the email addresses used do not need to match. Sign in with Apple is already enabled here on our community and is available in the 4.5 beta available to download now.
 -
You can allow your members to sign in to your community using their Apple ID with the benefits that brings such as FaceID/Touch ID and Two factor authentication. Using this method, members can also protect their privacy by choosing to hide their real email address. Their account will be created using a relay email address unique to your community. Sign in with Apple requires a paid Apple developer account that can be created at https://developer.apple.com. Creating the Credentials Once you have an Apple developer account you can create the credentials needed. Create an App ID Go to Certificates, Identifiers and Profiles. Click on Identifiers from the side menu and then the + icon to create an identifier. Choose App IDs on the first step and click continue. Enter a description and Bundle ID. The description can be anything you like but your community name is a good one. The recommended bundle ID is the reverse DNS style of your domain name e.g. com.yourdomain. Select "Sign in with Apple" from the list of capabilities and then confirm. Create a Services ID Return to the identifiers page, click the + icon again and this time choose Services IDs followed by Continue. For the description you can enter the same as you did for the App ID above. For the Identifier field enter the same identifier as in the first step followed by .client e.g. com.yourdomain.client. This is your Services ID - make a note of it, since you'll need it later when setting up Invision Community. Click Continue and then Register. You will see your service listed on the Services page. Click the service you just created. From the capabilities list, again select Sign in with Apple and then configure. This is where you will add your community domain name. First select the App ID you created in the first step above and then enter your domain name. If you only have one App ID on your developer account it should already be selected. The return URL should be set as the path to your community followed by /oauth/callback/ e.g. yourdomain.com/oauth/callback Click Next, then Done to close the popup. Click Continue then Save on the page. Create a Private Key After returning to Certificates, Identifiers & Profiles choose "Keys" from the side menu and then the + icon to create a new key. Enter a key name select Sign in with Apple from the list of capabilities and click configure. Select the App ID you created earlier and click Save. On the page you are returned to, click Register. A .p8 key file will now be generated. Be sure to save this key now as it can't be retrieved later. Finally, return to the key details page and make note of your Key ID. Fetch your Team ID The Team ID can be found on the Membership page in your Apple developer account, or at the top of most pages when creating/editing keys and services. Set up Invision Community You should now have a Services ID, Team ID, Key ID and Key file you can use to set up Invision Community. In your Invision Community admin control panel go to System > Settings > Login & Registration and click "Create New" on the Methods tab. Choose Apple from the list of handlers. You can now enter the credentials obtained above and upload the .p8 key file and set the other settings according to your preference. Click Save. A test of your settings will be performed and if everything is correct Sign in with Apple will be enabled on your community.
-
 Ever since Invision Community 4.x was launched you have been asking for the ability to categorize blogs in your community. We heard you loud and clear, but sometimes when a feature sounds straightforward, it requires some re-engineering of the framework. Because users in your community can create both blog entries and their own blogs to hold these entries, this was one of those areas. Starting with Invision Community 4.5 I’m pleased to announce that it is now possible for blog authors to categorize their blog entries and it's now possible for administrators to categorize blogs. Blog Entry Categories When creating a new blog entry, your members will now be able to create a new category for the entry or choose an existing one that had been created previously. Choosing your category when creating a new blog entry When a reader then visits the blog they can choose to display only those categories that interest them. Filtering by category Blog Categories Running a community where users can create their own blogs, you don’t only need to make sure individual pieces of content are categorized correctly, you also need to make sure the blogs themselves have a logical place. Well guess what? Now you can! As an admin you can now set up predefined categories in the control panel and Blog authors can then choose which one to create their new blog in. Managing blog categories We realize some of you have been waiting a long time to see these changes so we hope you enjoy this and everything else to come in Invision Community 4.5!
 -
 Invision Community has supported member referrals via the Commerce app since Commerce was called Nexus all those years ago. Community owners have been able to see at a glance who is spreading the word and members have received the kudos associated with a growing referral count in return. When planning Invision Community 4.5 we saw that this feature had the potential to be so much more… So what have we done to improve it? See Who Was Referred In addition to seeing a count of referrals, it’s now possible for both admins and members to see who they referred. If Commerce is enabled admins can also see how much commission (if any) was earned. The new referral settings page shows links, code snippets and who you've referred Member Promotion Seeing a rising count of who has been referred gives members a great feeling of community involvement but wouldn’t it be great if you could reward your members in other ways too? Referral counts now work as a member filter when using the group promotion feature. You can now automatically promote members that have referred more than a specific number of members to another user group and give them access to exclusive content. This still works alongside paid subscriptions so be another method for members not willing or able to pay for subscriptions to get access. Integration With Sharing If the feature is enabled, any time a link is shared via the built-in share links, referrals will be tracked. This occurs automatically without the member needing to think about it. It’s now easier than ever to see who your superfans are and who is bringing new people to the community. Blocks As well as the default share links we have added a new sidebar block that can be added anywhere across your community. This prominent call to action can be added on pages you think are most likely to result in recommendations. The new "Invite a friend" widget Given that referral capabilities have been expanded into many more areas outside of Commerce we decided that this should now be available as a core feature. Earning commission on sales as a result of referrals will still, of course, require Commerce to be installed. We hope that these are welcome improvements and they help you encourage more members to participate in your community.
 -
 As we come close to wrapping up development of Invision Community 4.3, we wanted to let you know of a few smaller improvements we've made to increase engagement to your community. Email Despite fancy new things like social media and push notifications, trusty old email has been proven to be highly effective at getting repeat visitors to your website. It's one of the reasons Invision Community has built in email support for notifications that can be sent instantly, or via daily or weekly digests. Email should form a part of every community marketing strategy but curating content and building newsletters can often be a labor intensive task. With Invision Community 4.3 we have added some additional automated email tools to help your users discover more of your carefully crafted content. Highlight the best content from throughout your community In 4.2 we introduced the concept of curated content with promotions and “Our Picks”. With 4.3 we’ve taken this a step further and these promoted items will now appear directly in your content related emails. This allows for your audience to be enticed back to your community with items that they may not have read but holds interest. Capture return visits with interesting content Social media links in email footers If you look closely in the image above you will also see that you can now optionally include links to all of your social media sites within the footer of all of your outgoing emails. Both of these new features are enabled by default but can be disabled in the email settings section of your admin control panel. Email may be as old as the web itself, but it is a very powerful medium to get your audience coming back for more. Respond to Reviews We added the ability to leave a review to Pages articles, download files, calendar events and in other areas early on in Invision Community 4. The concept was to allow your members to engage in new ways with your content. Reviews on Commerce store items and purchasable downloadable goods is a great way to inspire others to purchase. New to Invision Community 4.3 is the ability for the content creator (be that a download file, store owner, etc) to respond to a review. This is a great way to address reviews that may be considered unfair or extreme. Matt is talking to himself again One more thing... Not content with resurrecting the Subscriptions manager from 2009, we've brought back a small detail from previous versions of Invision Community. The famous "this person is typing a reply" indicator in the online list. We can't wait to release this latest update. With new ways to monetise your community, new ways to engage your audience and better promotion tools, we're excited to see how it's going to benefit your community.
 -
This is an entry about our IPS Community Suite 4.2 release and features content specifically aimed towards developers. If you are not interested in developing for 4.2 you may wish to skip this entry. Don't worry we still have lots of exciting core feature announcements still to come. We are expanding on the already available REST API endpoints to include more support for nodes. This significantly increases the flexibility of the API and now allows forums, downloads categories, calendars etc. to be created programmatically via external sources. As is usual with the existing content item endpoints, access for nodes is configured via the admin control panel for each API key that is generated. Configuring API Permissions via the Admin Control Panel For those new to the REST API, documentation can be found in the developer resources section and within the admin control panel. Endpoint Documentation New endpoints in 4.2 include; GET /core/groups - Get a list of groups GET /core/groups/{id} - Get information about a specific group DELETE /core/groups/{id} - Delete a group GET /forums/forums - Get a list of forums GET /forums/forums/{id} - Get information about a specific forum POST /forums/forums - Create a forum POST /forums/forums/{id} - Edit a forum DELETE /forums/forums/{id} - Delete a forum DELETE /blog/blogs/{id} - Delete a blog GET /calendar/calendar - Get a list of calendars GET /calendar/calendar/{id} - Get information about a specific calendar POST /calendar/calendar - Create a calendar POST /calendar/calendar/{id} - Edit a calendar DELETE /calendar/calendar/{id} - Delete a calendar GET /downloads/category - Get a list of downloads categories GET /downloads/category/{id} - Get information about a specific category POST /downloads/category - Create a category POST /downloads/category/{id} - Edit a category DELETE /downloads/category/{id} - Delete a category We are continuously looking for ways to improve developer functionality so if you have any ideas for additional endpoints or suggestions for improved documentation please feel free to share them in the comments below. We are really looking forward to seeing the new and imaginative ideas 3rd party developers can create using these additional capabilities.
-
This entry is about our IPS Community Suite 4.2 release In IPS Community Suite 4.2 we have added some additional customization options for Blogs The sidebar now features a space reserved for Blog owners to add a little further info, add links to social network sites, contact info, or anything at all they desire. The New Blog Sidebar The sidebar will show across all of the Blog pages (unlike the Blog description) and uses the standard built in text editor which supports all of the usual features such as embeds, images, links, and all other editor plugins you have enabled. Editing the sidebar is as easy as editing the Blog info via the Manage Blog menu. It's then a simple matter of toggling the sidebar on and entering the info. Editing The Sidebar The Blog sidebar content is controlled by the owner of the Blog and is only available if the administrator activates the option. If set, the content shows above any other widgets placed in the sidebar. This has been a frequently requested change and we are happy to add this to make Blogs more individual and engaging.
-
This entry is about our IPS Community Suite 4.2 release. Following on from our previous news entry "Add Similar Event" we are pleased to announce another feature that will make adding and discovering new events as easy as possible. Support for geographic event locations has been in Calendar for some time now but with 4.2 we have taken this a step further with venue support. When enabled, members can set the event location from a list of pre-defined venues. Address details and maps will then be automatically shown in the event view. Event view shows the venue map and address as well as a link to other events at the venue Additionally, a link will be added so that other events occurring at this venue can be discovered. Venue view shows all events at the location Venues can be added via the admin control panel or inline when adding events (for users with permission) ACP venue management Inline adding of venues when adding events If a venue has not already been added then a fallback to the standard address form input is provided. We have a few more Calendar improvements still to reveal so be sure to follow News & Updates for further announcements.
-
This entry is about our IPS Community Suite 4.2 release. Social Sign In has long been a feature of the IPS Community Suite but we are always looking for ways to make interaction easier for your visitors. A small but significant improvement we are able to add for 4.2 is to include social sign in links directly at the point where your customers are ready to contribute. Hassle free inline sign in brings your customers right back where they need to be to comment Visitors are much more likely to comment when the registration process is as fluid as possible and social sign in has fast become a familiar and efficient way of doing so. After signing up via these methods users are logged in and brought right back to where they started ready to comment. Feedback from our testers has already shown that this change has an immediate effect on the volume of new registrations and we look forward to making it widely available with 4.2.
-
This entry is about our IPS Community Suite 4.2 release. Recurring events are not new with IPS Community Suite but often you may wish to create similar events that don't necessarily occur on a regular schedule. Previously this has meant creating a new event for each and then manually re-entering the information for event description, location, cover photo, RSVP options and so on. Often the only thing changing between the events would be the date and time. Starting with IPS Community Suite 4.2 it is now possible to create a similar event based on one you have already added with a single action. Create a copy of an event in one simple step After opting to add a similar event you will be presented with the add new event form with all of the event info already filled out for you. Just set the date and time, make any required adjustments and submit your new event. Note: This option is only presented to the author of the original event in order to reduce visual clutter for regular visitors. We will be announcing many more interface improvements such as this in the coming weeks so be sure to follow the News & Updates section for updates.
-
This entry is about our IPS Community Suite 4.2 release. There are many Calendar related improvements in 4.2 designed to make adding and engaging with events easier than ever before. First of these is Event Reminders. Reminders are easy to create. Simply use the Set Reminder button shown on all future events and specify when you would like your reminder. Choose when you would like to be reminded Changed your mind? Simply adjust the reminder or remove it altogether. Easily adjust existing reminders When the time comes a notification will be sent via the member's chosen email or inline method. Receive inline or email reminders using the standard notification settings Event reminders are a simple but often requested feature and we're excited to be introducing it with 4.2. Don't forget to follow the News & Updates section as we have many more announcements to help keep your members engaged.
-
One of the goals for IPS Community Suite 4.0 was improving content discovery. In other words, making sure content still receives exposure even if it is posted in less used areas of the suite. The sidebar that shows on the IP.Board index page in 3.x helps with this goal to some extent, however people who visit the forums app infrequently may miss out on valuable content. This became an even more important issue when the decision was made to decouple IP.Board as a standalone application. What if the focus of your site is Gallery or what if IP.Board is not even enabled for example? Our solution was to extend the sidebar across all applications as shown below in IP.Downloads. You may notice from the screenshot that the announcements block is not specific to the downloads application. Any block can show in any application and they are configurable using moderator permissions. This immediately addresses the issue of content discovery. While the sidebar is now global in 4.0, it is important to note that individual areas can enable and disable the sidebar if necessary. Some areas of the suite simply require more room in order to display ideally, so the sidebar is disabled in these cases (e.g. the calendar "monthly" view needs a full page table grid to display in its ideal format). Further, you can configure sidebars differently for different areas of the suite in context-sensitive manner. You may show a recent topics block in the IP.Board application, for instance, while showing a recent files block in IP.Downloads. Or you can show both blocks in both areas - the choice is yours. Many areas of the suite have specific things they wish to automatically show in the sidebar and will do so. This is determined at a programmatic level and is not something that can be shut off. For instance, in IP.Downloads the primary screenshot and the download button show in the sidebar, while in IP.Calendar a map and a button to download an event show. Each application has the ability to output arbitrary content to the top of the sidebar where-ever necessary. It is also worth noting that advertisements have the inherent ability to display in the sidebar site-wide as well. Editing Editing is carried out inline from the front-end, rather than the ACP, and can be customized based on the application, module or individual view. The technicalities of this are beyond the scope of this blog entry but what this means in practice is that you can vary what is shown in the sidebar for each individual area of your site. Ordering of the blocks is of course fully supported using a simple drag and drop interface, and some sidebars additionally have configuration options available to them as needed. Here is a video demonstration of how editing the sidebar works in IPS Community Suite 4.0. Caching With this approach it was important that performance was not compromised and for that reason sidebar blocks support varying degrees of output caching. The active users block which must always be kept up to date utilizes no caching, a more general block showing overall statistics is cached for all users at once and other blocks that rely on permissions are cached for each user group combination. The level of caching used is determined by the developer when writing the block so, while it is important to mention that this performance aspect has been considered, it is something that is transparent to end users and admins in day to day use. Summary Community integration is a key strength of the IPS platform and the new sidebar in version 4 expands on this even further allowing you to share content across all areas effectively.
-
Day to day administration of your site and particularly managing member permissions has been greatly improved in IPS Community Suite 4.0. It is now easier than ever to see who has access to what but there are still times when being able to see exactly what a member sees can be useful. Perhaps a member is reporting that they can't view a section of the site or they need assistance altering settings on their account? For this reason administrators can log in to other users accounts automatically via the admin control panel where allowed. Security When dealing with access to other people's accounts security is of critical importance and we take this very seriously. Permissions for this are of course controlled by the ACP restrictions system so the ability can be toggled easily on a per user or group basis only to trusted administrators. The member also does not need to reveal their password to the administrator and all login actions are recorded in the logs so security and an audit trail is maintained. Logging In The process of logging in as a user starts in much the same way as in previous versions of the suite. When viewing a member in the ACP you simply click sign in and a new window with your user session is created. For IPS Community Suite 4.0 we have improved several areas of this implementation. Firstly, when logging in as a user you do not lose your existing admin session. You still show logged in as yourself but acting on behalf of somebody else. The user menu updates to show this and serve as a reminder so you do not forget to log out and continue posting using another account. All actions you now perform are as if you were logged in as the user themselves. Viewing and posting permissions reflect the user you are logged in as and any content created will show as if posted by that user. In previous versions not having this workflow was frustrating as you would log in as another user and then when you were finished need to log back out and then log back in with your administrator account. We have now made this seamless. When logging out from another user account in IPS Community Suite 4.0 you are simply returned back to your original admin session with no need to log back in. Summary We hope that these small but powerful changes make for a much more productive workflow. Helping members with access issues and making sure your user permissions are set up correctly should now be much more practical and intuitive.


