
Matt
Management
-
Joined
-
Last visited
Everything posted by Matt
-
 When someone registers, finishes a course, RSVPs to an event, or buys their first subscription, there's a short window when a well-timed email can make all the difference, such as a welcome, a next step, or a nudge towards the parts of your community they'd actually enjoy. The trouble is that these moments happen constantly, at all hours, for every member on their own timeline. Following up on each one by hand doesn't scale, so most of them go unanswered. Email Drip Campaigns solve that problem. They're automated email sequences that trigger off what a member does, then reach out at the right moments on their own, without you lifting a finger. What is a drip campaign?A drip campaign is a series of emails sent automatically over time, triggered by a member's action. Instead of one-off bulk mailouts, each member moves through the sequence on their own schedule, receiving each email at an interval you set. Say someone registers. You might send: Right away, a warm welcome and a pointer to your getting-started guide Two days later, an introduction to your busiest areas and how to follow them One week later, a nudge to introduce themselves and earn their first badge Every member gets the same thoughtful onboarding, whether they joined at 9am on a Monday or 3am on a Saturday. Triggered by what members actually doCampaigns begin when a member takes an action you choose, powered by the same robust and flexible system behind Achievements. There are many triggers, for example, you can start a campaign when someone: Registers and completes their profile RSVPs to an event Completes a course Purchases a subscription Joins a club Checks into your event ...and plenty more Reach exactly the right peopleNot every email suits every member. Each campaign includes member filters, so you can target properly by group, join date, activity, purchases, subscriptions, and more. We've also rebuilt the filter interface to make putting an audience together simpler and cleaner than before. Want to sanity-check your targeting? A built-in Check Member tool tells you straight away whether a specific member matches your campaign criteria. Know what's workingEvery campaign comes with its own statistics, showing how many members have started, how many are in progress, and how many have finished the sequence. Each email also carries its own unsubscribe link. So if members drop off, you can see exactly which email prompted them to leave. Given how complicated email deliverability can be, there is also a tool you can use to check specific members to ensure they are included in the reach parameters and have allowed automated emails. Chain campaigns togetherCampaigns don't have to stand alone. When a member finishes one, that completion can trigger the next, allowing you to build tailored follow-ups for different types of members. Onboard everyone with a welcome series, then route your subscribers, club members, and course students down their own paths from there. Ideas to get you startedThere are hundreds of ways to put drip campaigns to work, and the best ones usually come from knowing your own community. To get you started, here are a few we think are worth a look. Welcome series, helping new members find their feet in their first week. Onboarding guides to walk members through your community's features over several days. Re-engagement, winning back members who have gone quiet. Event follow-up, keeping the conversation going after someone checks in. Course completion, congratulating learners and pointing them to their next step. Getting startedEmail Drip Campaigns are available now on selected Invision Community Cloud packages. We'd love to hear how you plan to use drip campaigns in your own community. Let us know in the comments. Available on selected Invision Community Cloud packages.
 -
When someone registers, finishes a course, RSVPs to an event, or buys their first subscription, there's a short window when a well-timed email can make all the difference, such as a welcome, a next step, or a nudge towards the parts of your community they'd actually enjoy. The trouble is that these moments happen constantly, at all hours, for every member on their own timeline. Following up on each one by hand doesn't scale, so most of them go unanswered. Email Drip Campaigns solve that problem. They're automated email sequences that trigger off what a member does, then reach out at the right moments on their own, without you lifting a finger. What is a drip campaign?A drip campaign is a series of emails sent automatically over time, triggered by a member's action. Instead of one-off bulk mailouts, each member moves through the sequence on their own schedule, receiving each email at an interval you set. Say someone registers. You might send: Right away, a warm welcome and a pointer to your getting-started guide Two days later, an introduction to your busiest areas and how to follow them One week later, a nudge to introduce themselves and earn their first badge Every member gets the same thoughtful onboarding, whether they joined at 9am on a Monday or 3am on a Saturday. Triggered by what members actually doCampaigns begin when a member takes an action you choose, powered by the same robust and flexible system behind Achievements. There are many triggers, for example, you can start a campaign when someone: Registers and completes their profile RSVPs to an event Completes a course Purchases a subscription Joins a club Checks into your event ...and plenty more Reach exactly the right peopleNot every email suits every member. Each campaign includes member filters, so you can target properly by group, join date, activity, purchases, subscriptions, and more. We've also rebuilt the filter interface to make putting an audience together simpler and cleaner than before. Want to sanity-check your targeting? A built-in Check Member tool tells you straight away whether a specific member matches your campaign criteria. Know what's workingEvery campaign comes with its own statistics, showing how many members have started, how many are in progress, and how many have finished the sequence. Each email also carries its own unsubscribe link. So if members drop off, you can see exactly which email prompted them to leave. Given how complicated email deliverability can be, there is also a tool you can use to check specific members to ensure they are included in the reach parameters and have allowed automated emails. Chain campaigns togetherCampaigns don't have to stand alone. When a member finishes one, that completion can trigger the next, allowing you to build tailored follow-ups for different types of members. Onboard everyone with a welcome series, then route your subscribers, club members, and course students down their own paths from there. Ideas to get you startedThere are hundreds of ways to put drip campaigns to work, and the best ones usually come from knowing your own community. To get you started, here are a few we think are worth a look. Welcome series, helping new members find their feet in their first week. Onboarding guides to walk members through your community's features over several days. Re-engagement, winning back members who have gone quiet. Event follow-up, keeping the conversation going after someone checks in. Course completion, congratulating learners and pointing them to their next step. Getting startedEmail Drip Campaigns are available now on selected Invision Community Cloud packages. We'd love to hear how you plan to use drip campaigns in your own community. Let us know in the comments. Available on selected Invision Community Cloud packages. View full blog entry
-
The problem with having it running every minute is that you lose the optimisation of bulk inserts, and revert back to a constant stream of single inserts and from Invision Community's side, it means that it may delay other tasks from running if it dominates the schedule. However, there is a constant for those that do want instant updates, just add this to constants.php (but I do recommend against it). define( 'ELASTICSEARCH_QUEUE_INDEX', false );
-
If your community hosts meetups, workshops, conferences, or socials, Events is set to play a much bigger part in how you run them. Events arrived in Invision Community 5.0 with venues, online meetings and simple event management. In Invision Community 5.1, it grows into an event platform with richer discussions, proper registration, guest lists, paid tickets and QR check-in, so organisers can run the whole thing without leaving the community. More and more, community owners are looking for ways to connect their online space with what happens in the real world. We saw it with Quests, where giving members something to work towards drove real engagement, and now, we've overhauled Events to connect your community to events you run in person. Here's what's newA proper home for every eventWhile you could encourage members to discuss an upcoming event in a forum and upload event photos in a separate gallery, it all felt disconnected and scattered throughout your community. Every event now feels like its own space, with tabs for attendees, discussions and more, so everything about that event lives in one place. Organisers and attendees get a clearer picture of who's coming and what's being said, and you can automatically attach a photo gallery to events. Set it up once on the calendar, and every new event gets its own gallery with no extra setup. Useful for meetups and conferences where photos add context to the event. Discussions built around the eventMembers can talk about an event before it happens, while it's running and after it wraps up. You choose the level of engagement: simple comments for light conversation, or full discussions with reactions and follow options for events that need more depth. A casual social can stay simple, while a conference or training day can support real conversation around sessions, logistics and follow-ups. Registration that goes beyond a basic RSVPMembers have long been able to say “Going”, “Maybe” or “Not Going.” In Invision Community 5.1, that becomes a full registration workflow. For members you can: Register within the organiser's opening and closing windows. Bring guests, with name, email and phone collected when you need those details. Add or update guests after RSVPing. For organisers and admins you can: Control exactly when registration opens and closes. View the full attendee list, including the number of guests each member is bringing. See guest details and download lists as CSV. Control who can view attendee lists with group permissions. Get notified when someone RSVPs. Review RSVP activity over time in the AdminCP. It turns a simple yes or no into everything you need to actually plan the event, from headcount to who's bringing who. Sell tickets with CommerceA very popular request has been to sell tickets to events directly through Invision Community. Happily, with Invision Community 5.1, you can sell tickets directly through your community. For most use-cases, you no longer need to rely on a third party ticketing tool taking a cut of your sales. You can set a price per event and members complete checkout right after RSVPing. Guest names appear on invoices and purchase records, you can configure site commission and fees so organisers earn from their ticket sales, and coupons can be applied to specific events. When QR check-in is enabled, members can print their tickets too. Check in with QR codesWith Invision Community 5.1, in-person events get much smoother door management. Every attendee (and every guest) gets their own QR code. Organisers can check people in from the attendee or guest list, or attendees can scan their own ticket and check themselves in. Alternatively, you can also display a shared venue QR code so people check in on arrival. That's especially handy when the folks on the door aren't logged into the community as organisers. Check-in times are recorded on both the attendee and guest lists. Organisers with the right level of accessEvent authors can appoint organisers and give each person only the permissions they need: edit the event, download attendee and guest lists, view the guest list, or check attendees in. The event creator always keeps full access. That makes it far easier to run a larger event with a small team of registration desk staff, volunteers and co-hosts, without handing anyone the whole Admin Control panel. Built for how communities actually run eventsPut together, Invision Community 5.1 covers the full cycle of a community gathering. Promote: a clear event page with dates, discussion, and an optional gallery. Register: RSVP windows, guests, capacity, and notifications. Sell: optional paid tickets without the need for a third party. Manage: organisers, guest lists, and exports. Arrive: QR check-in at the door. Invision Community 5.1 builds on existing functionality by adding registration, ticketing, and a check-in layer that lets you run Events end-to-end within Invision Community. All functionality will be available across all Invision Community plans. View full blog entry
-
 If your community hosts meetups, workshops, conferences, or socials, Events is set to play a much bigger part in how you run them. Events arrived in Invision Community 5.0 with venues, online meetings and simple event management. In Invision Community 5.1, it grows into an event platform with richer discussions, proper registration, guest lists, paid tickets and QR check-in, so organisers can run the whole thing without leaving the community. More and more, community owners are looking for ways to connect their online space with what happens in the real world. We saw it with Quests, where giving members something to work towards drove real engagement, and now, we've overhauled Events to connect your community to events you run in person. Here's what's newA proper home for every eventWhile you could encourage members to discuss an upcoming event in a forum and upload event photos in a separate gallery, it all felt disconnected and scattered throughout your community. Every event now feels like its own space, with tabs for attendees, discussions and more, so everything about that event lives in one place. Organisers and attendees get a clearer picture of who's coming and what's being said, and you can automatically attach a photo gallery to events. Set it up once on the calendar, and every new event gets its own gallery with no extra setup. Useful for meetups and conferences where photos add context to the event. Discussions built around the eventMembers can talk about an event before it happens, while it's running and after it wraps up. You choose the level of engagement: simple comments for light conversation, or full discussions with reactions and follow options for events that need more depth. A casual social can stay simple, while a conference or training day can support real conversation around sessions, logistics and follow-ups. Registration that goes beyond a basic RSVPMembers have long been able to say “Going”, “Maybe” or “Not Going.” In Invision Community 5.1, that becomes a full registration workflow. For members you can: Register within the organiser's opening and closing windows. Bring guests, with name, email and phone collected when you need those details. Add or update guests after RSVPing. For organisers and admins you can: Control exactly when registration opens and closes. View the full attendee list, including the number of guests each member is bringing. See guest details and download lists as CSV. Control who can view attendee lists with group permissions. Get notified when someone RSVPs. Review RSVP activity over time in the AdminCP. It turns a simple yes or no into everything you need to actually plan the event, from headcount to who's bringing who. Sell tickets with CommerceA very popular request has been to sell tickets to events directly through Invision Community. Happily, with Invision Community 5.1, you can sell tickets directly through your community. For most use-cases, you no longer need to rely on a third party ticketing tool taking a cut of your sales. You can set a price per event and members complete checkout right after RSVPing. Guest names appear on invoices and purchase records, you can configure site commission and fees so organisers earn from their ticket sales, and coupons can be applied to specific events. When QR check-in is enabled, members can print their tickets too. Check in with QR codesWith Invision Community 5.1, in-person events get much smoother door management. Every attendee (and every guest) gets their own QR code. Organisers can check people in from the attendee or guest list, or attendees can scan their own ticket and check themselves in. Alternatively, you can also display a shared venue QR code so people check in on arrival. That's especially handy when the folks on the door aren't logged into the community as organisers. Check-in times are recorded on both the attendee and guest lists. Organisers with the right level of accessEvent authors can appoint organisers and give each person only the permissions they need: edit the event, download attendee and guest lists, view the guest list, or check attendees in. The event creator always keeps full access. That makes it far easier to run a larger event with a small team of registration desk staff, volunteers and co-hosts, without handing anyone the whole Admin Control panel. Built for how communities actually run eventsPut together, Invision Community 5.1 covers the full cycle of a community gathering. Promote: a clear event page with dates, discussion, and an optional gallery. Register: RSVP windows, guests, capacity, and notifications. Sell: optional paid tickets without the need for a third party. Manage: organisers, guest lists, and exports. Arrive: QR check-in at the door. Invision Community 5.1 builds on existing functionality by adding registration, ticketing, and a check-in layer that lets you run Events end-to-end within Invision Community. All functionality will be available across all Invision Community plans.
 -
Yes, we're working on a fairly broad semi-DDoS from a lot of rouge traffic. At it's peak, we had to scale 9 more database units to cope. We're actively working on it and hope to have things resolved soon. Some sites have attracted significant extra traffic that threatens to take parts of our network down, so we're working through those.
-
What sort of thing are you after?
-
To be clear, Invision Community 5.1 will be coming to Invision Community Classic (aka "self hosted"). Just like with v5, the first alpha releases are not thoroughly tested for upgrades, so the safest way is to create a number of cloud accounts running 5.1 Alpha 1. Invision Community Classic customers are welcome to join the alpha testing group.
-
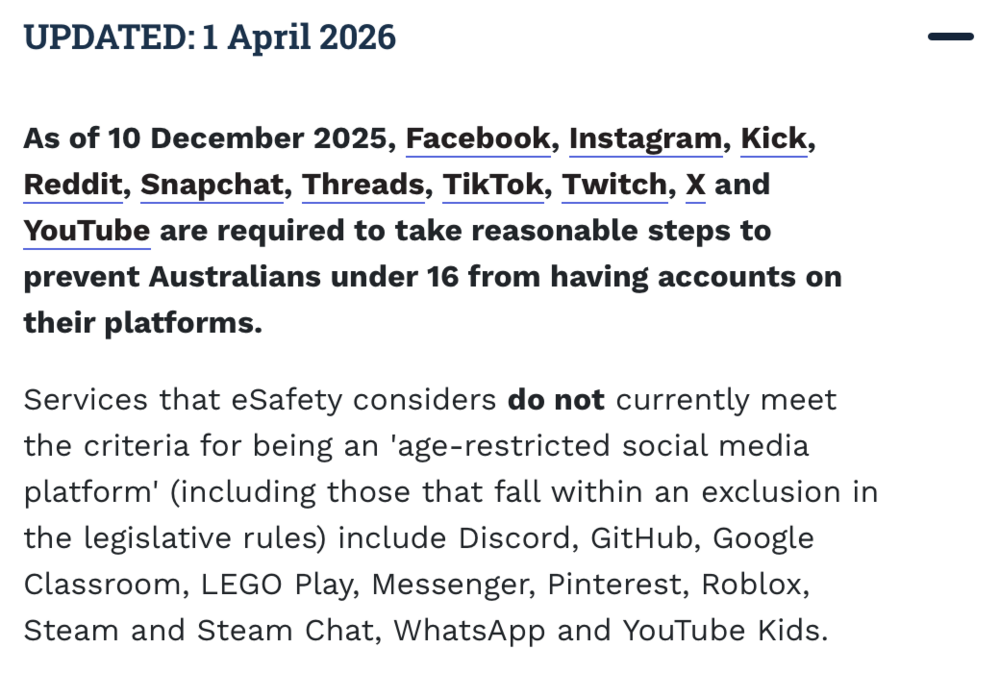
Invision Community 5.1 has been quietly in development for a while now, and brings many exciting things such as ⬛⬛⬛⬛⬛⬛⬛⬛⬛ and ⬛⬛⬛⬛⬛⬛⬛ It's worth noting that 5.0 to 5.1 is not a major leap, in the way that 4.x to 5.0 was, but there are several major 'things' along with a slew of improvements to key areas. We're at the point where enough has been finished that we're ready to get some early testing and feedback. How to applyAll you need to do is register your interest in this topic. We can't take everyone on, we're really looking for around six to begin with and you'll be testing on a new Cloud site pre-loaded with 5.1 Alpha. I'll contact those via DM with instructions on what to do next. Allow us a few days to wait for enough replies before we contact you. We'll aim to get going within the next few weeks. Thanks!It's the first logo that is the issue.We will be monitoring it closely.We're yet to see any real plan or legislation from the Government (and won't for many months) but the Australia ban does not include "text heavy platforms" such as Discord, so I see no reason that forums as a whole will be included in a ban, but as always, it depends on the contents of your forum. https://www.esafety.gov.au/about-us/industry-regulation/social-media-age-restrictions/faqs#which-platforms-are-age-restricted
 5.0.x supports up to 8.3. 5.1 (in development) supports 8.5.If you cannot replicate it on our site, then consider it fixed! There were some fixes to the unread functionality.It's not even our retail cloud plans. It's rarely used honestly and there are better ways of doing it in v5.I'd really like to find a way to share the same comment stream between both.It's mostly for our internal teams to use in a pinch, we generally create apps to make use of the listener/widget/events system.
 Pages is one of Invision Community’s most powerful features, allowing easy creation of blogs, knowledge bases, documentation, bug trackers and more. With the new Workflow Manager, it just got a whole lot more powerful. WorkflowsWorkflows enable you to perform multiple actions from a single button, triggered by criteria you define. For example, staff can process, approve, reject or update records with a single click, rather than manually working through several steps. This video walks you through setting up "Approve" and "Reject" buttons in a bug tracker. Match CriteriaWhen you create a workflow, you define the match criteria that control which records show the button. In our video, the "Approve" button should only appear on newly submitted bug reports. Once a report is already approved or closed, the button is no longer relevant, so it simply does not show. Criteria can be based on the item's status (hidden, pinned, featured, and so on) or on the value of a custom field, giving you precise control over when each workflow is available. ActionsThe next step is to configure the actions that fire when the button is clicked. You can mix and match as many as you need: Post a reply on the record Change the value of a custom field Change the item status (pin, hide, feature, and so on) Notify the item author Notify specific members Assign the item to a member or team If any action needs input from the person running the workflow, such as writing a custom reply, a small dialog will prompt them before the actions run. Putting it togetherWith the buttons configured, a single click can mark a bug report as accepted, post a public reply for the author, and fire a webhook to create an issue in GitHub automatically as every time a workflow runs, Invision Community fires an event, meaning you can connect workflows to external tools and services without writing any custom code. Beyond a bug trackerWorkflows are available for any Pages database. An approval process for submitted articles, a content review pipeline for a knowledge base, or a simple "mark as resolved" button for a support request database are all straightforward to set up. If you use a database to manage form submissions, a single workflow can update multiple fields and send a notification to whoever needs to take action next. Workflows are available for Creator Pro, Teams, Business and Enterprise.Pages is one of Invision Community’s most powerful features, allowing easy creation of blogs, knowledge bases, documentation, bug trackers and more. With the new Workflow Manager, it just got a whole lot more powerful. WorkflowsWorkflows enable you to perform multiple actions from a single button, triggered by criteria you define. For example, staff can process, approve, reject or update records with a single click, rather than manually working through several steps. This video walks you through setting up "Approve" and "Reject" buttons in a bug tracker. Match CriteriaWhen you create a workflow, you define the match criteria that control which records show the button. In our video, the "Approve" button should only appear on newly submitted bug reports. Once a report is already approved or closed, the button is no longer relevant, so it simply does not show. Criteria can be based on the item's status (hidden, pinned, featured, and so on) or on the value of a custom field, giving you precise control over when each workflow is available. ActionsThe next step is to configure the actions that fire when the button is clicked. You can mix and match as many as you need: Post a reply on the record Change the value of a custom field Change the item status (pin, hide, feature, and so on) Notify the item author Notify specific members Assign the item to a member or team If any action needs input from the person running the workflow, such as writing a custom reply, a small dialog will prompt them before the actions run. Putting it togetherWith the buttons configured, a single click can mark a bug report as accepted, post a public reply for the author, and fire a webhook to create an issue in GitHub automatically as every time a workflow runs, Invision Community fires an event, meaning you can connect workflows to external tools and services without writing any custom code. Beyond a bug trackerWorkflows are available for any Pages database. An approval process for submitted articles, a content review pipeline for a knowledge base, or a simple "mark as resolved" button for a support request database are all straightforward to set up. If you use a database to manage form submissions, a single workflow can update multiple fields and send a notification to whoever needs to take action next. Workflows are available for Creator Pro, Teams, Business and Enterprise. View full blog entryManual PHP is available on Enterprise.The Page Builder makes it easy to create attractive pages with widgets, custom HTML and Invision Community data. One of the most-used block types is the custom HTML block, which lets you drop markup anywhere on a page. However, if you want to use the same design in multiple places, perhaps a feature card, a promotional banner, or a testimonial, you have to create a separate block each time and maintain them individually. Template Blocks solve that. How Template Blocks workA Template Block combines a custom HTML template with a set of fields you define. Instead of hardcoding the content, your template uses placeholders. Each time you place the block on a page, you fill in the fields and the template renders with that content. Setting one upStart by creating a new block and choosing the Template Block type. Define the fields you need such as a heading, an image URL, a short description, whatever your design calls for. Write the HTML template, using the field placeholders. as Save the blockOnce saved, it works like any other block in the Page Builder. Drop it onto a page, click Edit, fill in the fields and save. Drop it again somewhere else and give it completely different content. A practical exampleSay you have a "Featured Member" card used in several places across your community. With a Template Block, you design the card once and fill in a different member's name, photo and bio each time you place it. Update the card's design and update every instance accordingly. Template blocks can be a great way to simplify the number of blocks you have, and make it much easier to edit once on the page in the future. We would love to hear how you use Template Blocks in your community. Share your ideas in the comments below. View full blog entry
 The Page Builder makes it easy to create attractive pages with widgets, custom HTML and Invision Community data. One of the most-used block types is the custom HTML block, which lets you drop markup anywhere on a page. However, if you want to use the same design in multiple places, perhaps a feature card, a promotional banner, or a testimonial, you have to create a separate block each time and maintain them individually. Template Blocks solve that. How Template Blocks workA Template Block combines a custom HTML template with a set of fields you define. Instead of hardcoding the content, your template uses placeholders. Each time you place the block on a page, you fill in the fields and the template renders with that content. Setting one upStart by creating a new block and choosing the Template Block type. Define the fields you need such as a heading, an image URL, a short description, whatever your design calls for. Write the HTML template, using the field placeholders. as Save the blockOnce saved, it works like any other block in the Page Builder. Drop it onto a page, click Edit, fill in the fields and save. Drop it again somewhere else and give it completely different content. A practical exampleSay you have a "Featured Member" card used in several places across your community. With a Template Block, you design the card once and fill in a different member's name, photo and bio each time you place it. Update the card's design and update every instance accordingly. Template blocks can be a great way to simplify the number of blocks you have, and make it much easier to edit once on the page in the future. We would love to hear how you use Template Blocks in your community. Share your ideas in the comments below.Yes, you could create a Pages page and use that, with anything you want embedded via a HTML widget. Or you could create a database and use that to hold the contact requests, and set up any custom fields you need and edit the form template (if required).I can reply in more detail later, but this is a fairly common request. You can use javascript to detect the browser language of the person viewing, so you could create a little HTML widget with just javascript in it to detect the browser's language, if it doesn't match the current language, display a modal/box on the page to offer them to go to the correct page.