

Mark
Clients
-
Joined
-
Last visited
Everything posted by Mark
-
End of an era ❤️
-
 One of the most popular requests we get for Commerce is for a free trial period for subscriptions. We've heard from many clients that wish to allow their members a free, or reduced cost trial period before auto-renewing the full price. I'm pleased to say that we've now added this functionality into Invision Community 4.5. Let us take a look at how it works. Initial Terms In 4.5 you can now specify an initial term that is different to the normal renewal term for any subscription plan or product. For example, you could make the initial term $0 for 1 week and the normal renewal term $10 per month which will allow you to create 1 week free trial. The initial term doesn't have to be $0, you can use any special price for the initial term you like. Subscription Plans showing Free Trials For developers creating their own applications with Commerce integration, this functionality is also available to you simply by passing a DateInterval object representing the initial term when creating the invoice. Collecting Payment Details for Free Trials Previously, if you were buying something that is free, the entire of the last step of the checkout would just be skipped and the invoice marked as paid. In 4.5, if: The user is purchasing something which has a free initial period, but also has a renewal term (i.e. is a free trial), and You have a payment method which can collect card details (Stripe, Braintree, etc) The user will be prompted to provide payment details that will not be charged until after the free trial. If the user already has a card on file they will not be prompted to provide the details again but will see a confirmation screen rather than the order just being marked paid immediately. Checkout Process for a Free Trial As you can see, allowing a free or reduced cost trial period has never been easier. We hope that you enjoy using this new feature of Invision Community 4.5.
 -
 Zapier is a service that allows you to connect over 2,000 web apps. In Invision Community 4.5 we are launching a beta service of Zapier integration for Invision Community in the Cloud. What does Zapier do? Zapier acts as a bridge between Invision Community and other apps, such as Google Docs, Twitter, Facebook, Slack, Trello, Facebook Ads, ActiveCampaign, Zendesk, Asana, Salesforce, Hubspot, Discord, Stripe and more. Zapier has over 2000 apps registered currently, and that number grows every single day. Let us look at a real life example. Right now, if you wanted to add a member to a Google Sheets document each time a new registration was completed, you'd need some fairly complex code to be written that was "triggered" by this registration event. This would take days to write at some cost. Zapier simplifies this by allowing you to connect Invision Community with Google Sheets without needing a single line of code. Zapier allows you to streamline your workflows in minutes. Zapier has two types of events, triggers and actions. Triggers When a certain thing happens on Invision Community, like a member registering or a topic being posted, a trigger can be sent to Zapier to then run actions in other apps. For example, you might create a zaps to... When a member registers, add their email to a Mailchimp list. When a moderator posts a topic in a news forum, share it on Facebook, Twitter and other social platforms. When a member posts something that requires moderator approval, send a message to a Slack channel for your moderators. Invision Community Integration with Mailchimp through Zapier Actions You can also set up Zaps so that when something happens in an external application, it triggers an action in your Invision Community. For example, you might create a zaps to... When you add an event in a Google Calendar, create a Calendar Event on your community. When you receive an email to a feedback email address, create a topic on your community in a forum for moderators. When you create a task in Trello, add a record to a Pages Database on your community. Invision Community Integration with Google Calendar through Zapier Self-Integration In addition to using Zapier to integrate with third party services, you can also connect an Invision Community trigger to an Invision Community action. For example: when a member registers, create a topic in a welcome forum. Self-Integration through Zapier Frequently Asked Questions What integrations are available? In the beta launching with Invision Community 4.5, Zapier will be able receive a trigger when a member account or content (forum post, gallery image, etc.) is created and send actions to create the same. More triggers and actions will be added over time. When will this integration be out of beta? Later this year. Will third party applications and plugins be able to create Zapier triggers and actions? Because the integration requires an app hosted with Zapier (which is written in Node.js) and this has to be submitted directly by the vendor, it will be difficult for third party applications and plugins to integrate with Zapier through Invision Community's integration. In the future we may be able to provide basic abstracted integrations for third party applications and plugins through an extension API. In the meantime, third party authors can of course write their own Zapier Apps if desired.
 -
-
Version 4.4.6 is a maintenance update to fix issues reported since 4.4.5.
-
 Braintree is a payment gateway provided by PayPal which provides some great additional features for PayPal transactions including a significantly improved recurring payments model. We are delighted to be bringing full support for Braintree for Commerce in Invision Community 4.4. What is Braintree? Braintree is a payment gateway provided by PayPal which supports taking payments by credit cards (including Apple Pay and Google Pay) and Venmo as well as PayPal, providing a good option for communities wanting to use a single payment gateway, and also brings improved functionality for recurring PayPal transactions. For PayPal transactions, there are no additional fees and the checkout experience uses the normal PayPal experience your customers are used to. Recurring PayPal Improvements Recurring payments / Billing Agreements in PayPal have up until now been initiated by PayPal. Invision Community tells PayPal what the renewal terms of a purchase are, but then it's up to PayPal to take that payment and notify your community when it succeeds (or fails). This comes with a number of limitations and problems. It makes it difficult for you as an admin to modify an existing purchase or for the customer to upgrade/downgrade. It also means the customer has to create separate Billing Agreements for each purchase. Most significantly though, it means if there is a delay in receiving the payment (such as an expired card) it is sometimes unclear what should happen on your community's end, and how it can be resolved if/when the payment is received. Other payment gateways work the other way around. When a customer pays by card, for example, they have the option of storing their card details. Later, if they make another purchase or a renewal invoice is generated, Invision Community can tell the gateway to recharge the same card - and if it fails, allow the customer to provide an alternative payment method. This allow both you and your customers to have much greater control, and is much more reliable. Braintree resolves this by allowing customers when paying with PayPal to save their PayPal account in the same way they would save a credit card on file. When paying with PayPal, users will see a simple checkbox which, if checked, will allow future payments to be taken with PayPal automatically. Storing PayPal Accounts for Recurring Payments Other Features In addition to an improved checkout experience, our integration with Braintree supports: Taking payments by Credit Card, including 3DSecure checking and the ability for customer to store card details on file. Braintree uses a fully PCI-compliant method of taking card details in a way that ensures the card information never reaches your server. Apple Pay and Google Pay Venmo, which also allows storing accounts in the same way as PayPal accounts. Offering PayPal Credit Handling chargebacks/disputes Support for Braintree's Advanced Fraud Tools A Disputed PayPal Transaction Existing Setups and Upgrading The existing PayPal gateway will continue to be available for basic PayPal integration, and your existing set up will continue to work exactly as it does now after upgrading. If you are using PayPal, especially if you are using Billing Agreements, we strongly recommend switching to Braintree after upgrading. While it isn't possible to convert existing Billing Agreements, you can allow existing ones to continue to work and use Braintree for new purchases. Please note that while existing setups will work fine, from 4.4 it will no longer be possible to set up a new PayPal method with either Billing Agreements, or to take payments by card, as PayPal has deprecated the API this was using in favour of Braintree and it can no longer be enabled on new accounts. As mentioned though, this does not affect any existing setups, which, if you do not switch to Braintree, will continue to work as they do now. This blog is about our upcoming release Invision Community 4.4.
 -
 Allowing your customers to find exactly what they need as fast as possible will no doubt increase sales. A good number of our customers use Commerce to sell physical items. Until now, it's always been a little tricky to set up the store to allow customers to drill down into specific items within the store. In Invision Community 4.4, the sidebar in the store now includes filter options to help customers find the product they're looking for. Using the filter sidebar Administrators can set up whatever filters they like for each product. In this video above, you can see we have set up filters for color and price. You can set these filters up in the AdminCP by simply specifying each possible option: Creating a custom filter Once the filters have been set up, you can then add each filter to the categories it applies to (so you can have different filters for different categories) and when editing any product you can specify as many values for each filter as is appropriate (for example, if you have a color filter, you can choose multiple colors if the product allows the customer to choose a color, or if the product has multiple colors). Choosing the filter values when creating/editing a product In addition to these custom filters, you will also see filters for price (you can set appropriate bands for each category), rating, and stock level. Other Commerce Improvements In addition, we also have a few more features new to Commerce in 4.4: There are new sidebar blocks for best selling products, latest products, product reviews and a featured product. When sending a bulk mail, you can target recipients by the total amount they have spent. Categories with no products in them are hidden automatically in the store. Notification emails sent to customers to let them know their purchase will expire soon (including if they will be automatically charged) have been improved to show more clearly what will happen. When viewing a customer page in the AdminCP, active purchases are separated from expired and cancelled purchases to make it easier to discern which are active. Custom field values are now included on printed invoices. When filtering support requests in the AdminCP, you can now choose "more than" or "less than" for all time-based filter options. When using stock actions to reply to support requests, the stock reply can be incorporated into the staff member's default reply content rather than overwriting it. Invoices in the AdminCP can now be filtered by status. This blog is part of our series introducing new features for Invision Community 4.4.
 -
 It's very easy to focus on a single metric to gauge the success of your community. It's very common for community owners to look at page hits and determine if their SEO and marketing efforts have paid off. Getting traffic to your site is only half the equation though. The most valuable metric is how many casual visitors you're converting to engaged members. Invision Community already makes it easy for guests to sign up using external services such as Facebook, Twitter and Google. However, there has to be a conscious decision to click that sign-up button. For some, this may be a barrier too many. Invision Community 4.4 reduces this barrier by allowing guests to create a post to a topic they want to engage with. Once they have posted, they are asked to simply complete their registration. They are more likely to do this now they have invested in your community. This will be incredibly valuable when you consider how much traffic a forum receives from inbound Google searches. With Post Before Registering, you'll increase your chances of turning that inbound lead into a registered member contributing to your site. Let me take you through the feature and show you how it works. When browsing the community guests will see the ability to submit a post, with an explanation that they can post now and complete registration later. The only thing they have to provide in addition to their post is an email address. Posting as a guest This works in any application for new content (topics, Gallery images, etc.) as well as comments and reviews. It will only show when a newly registered member would be able to post in that area - for example, it will not show in a forum that only administrators can post in. After submitting the post, the post will not be visible to any user, but the user will immediately be redirected to the registration form with an explanation to complete the registration. The email address they provided will already be filled in. Registration form after posting as a guest At this point, the user can either fill in the registration form, or use a social sign in method like Facebook or Twitter to create an account. After the account has been created, and validation has been completed if necessary, their post will automatically be made visible just as if they had registered and then posted. If the user abandons the registration after they've submitted their post, an email will be sent to them to remind them to complete the registration. Email reminding user to finish registering Some Notes Invision Community already has a feature that allows guests to post as guests without registration if granted permission. That feature has not been removed and so if you already allow guests to post, the behaviour will not change. This new feature is only available when a guest can't post in a given area, but a member would be able to. The entire feature can also be turned off if undesired. If the area the guest is posting in requires moderator approval, or newly registered members require approval of new posts, the post will enter the moderation queue as normal once their account has been created. Third party applications will require minor updates to support this feature. Once your casual visitor has invested time in your community by crafting a post, they are much more likely to finish the registration to get it posted. If you have set up external log in methods, then registration only takes a few more clicks. This blog is part of our series introducing new features for Invision Community 4.4.
 -
 Do you recall that scene in Harry Potter where young Harry is sitting in his Uncle’s living room when hundreds of letters from Hogwarts burst through the fireplace, filling the room? Sometimes, when you log into the administrator’s control panel, it can feel a bit like that. As the administration control panel has evolved, there has been more of a need to display notifications, alerts and warnings to the administrators. There are several things which may require an administrator's attention which may show a notice on the AdminCP dashboard, a banner on the community, or send an email. For example: When a new version of Invision Community is released. A new member registers and requires administrator validation. A configuration issue is detected, for example if dangerous PHP functions are enabled on the server. There are items Commerce which require manual action, such as transactions pending manual approval or items to be shipped. Up until now, each such area would manage how these notifications show and are sent independently. In 4.4 we have introduced a new section of the AdminCP which shows all things which require administrator attention in one place, easily accessible from any AdminCP page. AdminCP Notification Menu Clicking on any of these notifications will take you to the relevant area of the AdminCP, or there is also a full-screen Notification Center which allows you to quickly take common actions such as approving members. AdminCP Notification Center While the best approach is to take the appropriate action (which will automatically dismiss the notification) so you always have an empty Notification Center, most notification types can be hidden, either temporarily on a per-notification basis by clicking the cross in the top-right, or administrators can hide all notifications of a certain type from their individual settings. Administrators can also choose which type of notifications to receive an email notification about. Notification Settings Each notification has a severity indicated by the coloured bar on the side and certain notifications can also show banners either across the AdminCP, or also on the front-end (to administrators). Notifications group automatically (so for example, if there are 5 members pending approval, you will see 1 notification rather than 5 separate ones) and where appropriate each administrator can choose if they want to receive a single email, or a separate email with each occurrence. Now you won't miss an invitation to Hogwarts, or anything important again. This is a blog about our upcoming Invision Community 4.4 release, due later this year.
 -
Version 4.3.5 is a small maintenance update to fix issues reported since 4.3.4.
-
Added a filter to view members that have opt-in for bulk mail in the ACP, and an option to opt-out those members Bug fixes
-
New features for GDPR compliance: New feature for administrators to download an XML file of all personal information held. New setting to automatically prune IP address records. New option when deleting a member to anonymize content submitted by them. New setting to automatically add links to privacy policies of integrated third party services such as Google Analytics or Facebook Pixel to your privacy policy if they are enabled. Fixes an issue where Calendar events submitted in different timezones to the user may show at the wrong time. Other minor bug fixes and improvements. Learn more about GDPR compliance features in this release
-
Version 4.3.2 is a small maintenance update to fix issues reported since 4.3.1, including: Promotes non-functional when "Our Picks" disabled. Various emoji fixes, including skintones and mobile issues. Online stats. Numerous IE11 fixes. PayPal billing agreements failing due to lack of address.
-
This is a maintenance to release to the 4.2 series address security issues. As we prepare for our next large release, version 4.3, we do large security audits. We decided to apply those security enhancements to the 4.2 series so you can get them now if you prefer to not upgrade to 4.3 yet. We would like to thank @newbie LAC for his assistance.
-
This is a maintenance to release to address security issues. As we prepare for our next large release, version 4.3, we do large security audits. We decided to apply those security enhancements to the 4.2 series so you can get them now while we begin public betas of 4.3. We would like to thank @newbie LAC for his assistance.
-
Introduction You can link Invision Community with a Wordpress site to allow users to sign into one community using their credentials from another. First you need to decide which direction the login should happen: Allow users to log into your Invision Community with their account on a Wordpress site (Wordpress as the Server). Allow users to log into your Wordpress site with their account on an Invision Community (Invision Community as the Server). Only follow the instructions below for which direction you want. SSL is required on both Invision and word press. Option A: Wordpress as the Server 1. Setup the Wordpress Plugin First you will need to install the OAuth Server plugin for Wordpress to enable OAuth functionality on your Wordpress site. To do this, from your Wordpress Dashboard, go to Plugins > Add New, search for OAuth server. Find the miniOrange OAuth 2.0 Server/Provider by miniOrange (there are several plugins with similar names available) and click Install, and once it has installed, click Activate. Installing Wordpress Plugin After it has installed, go to the new miniOrange OAuth Server section and follow the instructions to complete the registration process. 2. Create the Client On your community, go to AdminCP -> System -> Login & Registration, click Create New to setup a new login method and choose Wordpress. Meanwhile, from your Wordpress Dashboard, go to miniOrange OAuth Server -> Add Client. Enter a name (such as the name of your community) and for the Authorized Redirect URI field enter the value shown in your AdminCP, which will be your community's URL ending with "/oauth/callback/" on the end. You should now see a screen with a Client ID and Client Secret. Wordpress Client Details 3: Set up Invision Community Back in your AdminCP, fill in the form, using the Client ID and Client Secret that you just obtained. You will also need to configure the text, color and logo to use for the button that users will click on to log in. Enterring details in Invision Community You should now be able to log into Invision Community through Wordpress! Option B: Invision Community as the Server 1. Configure Invision Community On your Invision Community, go to AdminCP -> System -> REST & OAuth and click Create New and fill out the form selecting Wordpress for Client Type. You will then see a screen with details you will need to enter into Wordpress. Client Details for Wordpress 2. Configure Wordpress Initial Setup First, from your Wordpress Dashboard, go to Settings > Permalinks. You must have the Post name option selected. If you haven't, change this and save the form. Installing the Plugin Next you will need to install the oAuth Login plugin for Wordpress to enable OAuth functionality on your Wordpress site. To do this, from your Wordpress Dashboard, go to Plugins > Add New, search for OAuth login. Find the OAuth Single Sign On - SSO (OAuth client) by miniOrange (there are several plugins with similar names available) and click Install, and once it has installed, click Activate. Installing Wordpress Plugin After it has installed, go to the new miniOrange OAuth section and follow the instructions to complete the registration process. Creating the Client You can now enter the client details in Wordpress. Enter all of the details exactly as they are shown in your Invision Community AdminCP. Please note: we have noticed that if you choose the "Invision Community" option, some versions of the plugin pre-enter the value for Get User Info Endpoint as https://<your-domain>/oauth/core/me but the correct value is either https://<your-domain/api/core/me or https://<your-domain/api/index.php?/core/me - make sure you enter the correct value shown in your AdminCP. Enterring details in Wordpress You then need to add the sign in button in your desired location. For details on how to do this, go to the Sign In Settings tab for information. You can also configure how the button appears under the Customizations tab. Once this is done, you will see the sign in button on your Wordpress site. Sign In Button on an Example Wordpress Site
-
This integration requires access to the legacy Twitter 1.0 API. New developer accounts do not have access to this. We are working on migrating to Twitter 2.0 API, this guide will be updated when this has been completed. You can allow your members to sign in to your community using their Twitter account. To start the process, go to AdminCP -> System -> Login & Registration, click Create New to setup a new login method and choose Twitter. You will now be prompted to fill in some details which you'll need to acquire by creating an "app" with Twitter. Getting API Access Before you are able to create a twitter application, you first need to get access to the twitter API. To do this, visit https://apps.twitter.com and sign in with your twitter account. If you click on create app, it will ask you to first apply for access to the API. Click apply first of all. Once you have done this, you will be presented with the following screen, which you need to select "Doing something else" from the options. Choose Reason Once you have selected the reason, you will be asked to confirm your details. Unless you have any pressing reason to do so, you should click next at the bottom of the page. API developer Details You will now be asked a series of questions related to the use of the API on your site. Here we will be filling in the "In your words" section at the top, and the "Do you plan to display tweets............outside of twitter?" section at the bottom. All other items should have "No" selected. For the first item of "In your words" you need to enter something like the following screenshot. In your words For the last section, enter something like the below Data outside twitter Click next to complete the application. You will be asked to confirm your email address. Ensure you do this before continuing to the next section of our guide below. Creating a Twitter App 1. Go to the Twitter Application Management site and sign in with your Twitter account. 2. Click Create App and fill out the form. For the Website field, enter the URL to your community. For the Callback URLs field enter the value shown in your AdminCP, which will be your community's URL ending with "/oauth/callback/" on the end. 3. Go to the Settings tab and make sure the Allow this application to be used to Sign in with Twitter checkbox is checked. Then also provide a value for the Privacy Policy URL and the Terms of Service URL (you can create pages for these in your AdminCP under System -> Terms & Privacy Policy if you haven't already). Make sure you click Update Settings to save. Twitter Settings tab 4. Go to the Permissions tab and click Edit. Ensure that Access is set to Read and Write, and then check the Request email addresses from users checkbox (it will not be checked by default). Make sure you click Update Settings to save. Twitter Permissions tab 5. Go to the Keys and tokens tab to obtain the values you need to enter into the AdminCP. Twitter Keys and Access Tokens tab Back in your AdminCP, fill in the form, using the Consumer Key and Consumer Secret that is shown on the Keys and Access Tokens tab from Twitter. Entering details in Invision Community
-
You can allow your members to sign in to your community using their Microsoft account. To start the process, go to AdminCP -> System -> Login & Registration, click Create New to setup a new login method and choose Microsoft. You will now be prompted to fill in some details which you'll need to acquire by creating an "app" with Microsoft. Creating a Microsoft App 1. Go to the Microsoft Azure App registrations page and sign in with your Microsoft account. 2. Click New Registration and fill in a name (just use the name of your community). 3. Unless you have a specific need to change it, under "Supported account types" leave "Accounts in any organizational directory and personal Microsoft accounts (e.g. Skype, Xbox, Outlook.com)" selected. 4. Under the field labelled Redirect URI, leave the dropdown selected as "Web" and then enter the value shown in your AdminCP into the text field. You must then click Register at the bottom to save this. App Details Page 5. Copy the Application (client) ID shown on this page, along with password, into the AdminCP under Application Id. ACP screen 6. In the Azure App registrations page for the application you just created, click Certificates & secrets in the left hand menu. Click the New client secret button. Set the secret to Never expire, provide an optional description, and click the Add button. Creating client secret 7. Copy the value displayed on the Certificates & secrets page after adding a new client secret and paste it in to the AdminCP as the Password. 8. Finish creating the new Login Method and verify you are able to successfully log in to your community using a valid Microsoft account.
-
You can allow your members to sign in to your community using their LinkedIn account. To start the process, go to AdminCP -> System -> Login & Registration, click Create New to setup a new login method and choose LinkedIn. You will now be prompted to fill in some details which you'll need to acquire by creating an "application" with LinkedIn. Creating an application with LinkedIn 1. Go to the LinkedIn Developers page and sign in with your LinkedIn account. 2. Click Create App and fill in the form. 3. You will now see your application details. Click on the Auth tab, and then under the OAuth 2.0 settings section, you will see a field labelled Redirect URLs. Click the pencil icon to edit this setting, and add the value shown in your AdminCP. You must click Update at the bottom to save this. LinkedIn Application Page 4. On the 'Products' tab, select "Sign In with LinkedIn", accept the terms, and click to add this. (You will need to await approval for this) Products Adding 5.Back in your AdminCP, fill in the form, using the Client ID and Client Secret that are shown on the LinkedIn application Auth screen. Entering details in Invision Community
-
You can allow your members to sign in to your community using their Facebook account. In order to use facebook, your site must be on a secure https domain. You can see more information on how to switch to https after obtaining an SSL certicate from your hosting company in the following guide Basic Facebook Login To start the process, go to AdminCP -> System -> Login & Registration, click Create New to setup a new login method and choose Facebook. You will now be prompted to fill in some details which you'll need to acquire by creating an "app" with Facebook. Creating a Facebook App 1. Go to the Meta for Developers site and sign in with your Facebook account. 2. If you have not already registered with Facebook for Developers, click Register Now and follow the instructions to register 3. Click on My Apps in the top right, then select 'Create App Click to create a new app 4.Select "None" when asked for an app type App Type Selection 5. Add a name for the login and an email address, then click create app Facebook App Dashboard 6. Select "Facebook Login" from the product list 6. Select "www" and from the quickstart list 7. Add your site URL, then click continue 8. The next 3 screens can be ignored. Click on next on each until you get to the last section, then go to the next step. 9. Click on "basic"You will then be taken to the basic settings page for the new application. Here you need to add your privacy policy, and your terms of service, and logo, then save. Basic Settings 7. Go to the Products > Facebook Login > Settings tab from the left sidebar. In the Valid OAuth redirect URIs field enter the value shown in your AdminCP, which will be your community's URL ending with "/oauth/callback/" on the end. You must click Save Changes at the bottom to save this. Callback URL Set Up Invision Community Go to Settings > Basic from the left sidebar. You will see your App ID and a button to reveal the App Secret. Back in your ACP, fill in the form, using these details. App ID and Secret Now go to the front-end of your community, log out, and log in with the Sign in with Facebook button. At this point, only your own Facebook account, which you used to create the client, will work. If it works, you can continue to the next step. Entering details in Invision Community Once you have done the above, you will be able to use facebook to login to your community. Go Live IMPORTANT: - Do not go live with your product, until you have completed any application permission reviews required by facebook for Statuses, and/or social media promotion. In the top-right you will see an On/Off switch next to Status: In Development. Click the on/off switch and confirm. The switch should now indicate On and you should see Status: Live. Live Facebook App Note if you wish to enable status imports, you will need to add more permissions and get your application permissions reviewed by facebook. You should then continue below. If you only want sign in ability, you are finished at this point Optional: Enabling Status Imports Before you begin, please note, we can give advice on how to fill this in, however some details may vary based on your own uses. You will also need business verification in order to set this up. This is per facebooks guidelines. When setting up Facebook Login in your AdminCP you will have seen a Allow Status Imports? setting which mentions requiring additional setup. Using this feature means gaining access to restricted Facebook APIs, which, before you can do, you need to get approval from Facebook. 1. To get started, enable the Allow Status Imports? setting from AdminCP -> System -> Login & Registration -> Facebook. 2. On the Facebook for Developers site, go to App Review -> Permissions and Features from the left-side menu. Use the search box at the top to search for user_posts 3. select the "Request" option then select continue 4. You will now see the review, for each of the items you have chosen, there is an Add Details link. Request a review Click Add Details and fill in the form. An example of what to provide can be seen below. In addition to these information, you will need to provide a screencast of you demonstrating that process of signing in with Facebook and doing the thing you are asking Facebook for permission for (importing a status or automatically sharing to Facebook). Make sure your video shows you doing exactly the steps in the instructions you provided otherwise your review will likely be rejected. You do this by using your own account and switching your facebook application to developer mode This video needs to show your community, so we cannot provide a video for you to send to Facebook - you must record and submit it yourself. For Tell us how you're using this permission or feature enter something like the following: For Demontrate how your selected platforms will use this permission or feature? choose Web. Under this option, you will need to stated how this is used by the user. Enter the following information to show how a user logs in (please modify if your options are in different places due to theming or 3rd party items) You will then additionally need to do a screencast to show on video how the system is used. This can be uploaded to the same form. Click on save once complete 6. Click Submit For Review to submit the review and confirm the submission. You will be advised how long it will take you for Facebook to approve the submission, and should receive an email once it is complete
-
You can allow your members to sign in to your community using their Google account. Applies to self-hosted customers only Important - Google requires that sites using their login API, are using a secure connection. If your site is not using SSL (HTTPS), please contact your hosting company to obtain a valid SSL certicate, then follow this guide to switch to https. https://invisioncommunity.com/4guides/advanced-options/configuration-options/using-ssl-https-r273/ To start the process, go to AdminCP -> System -> Login & Registration, click Create New to setup a new login method and choose Google. You will now be prompted to fill in some details which you'll need to acquire by creating a "project" with Google. Creating a project 1. Go to the Google APIs Console and sign in with your Google account. You may have created a project if you have enabled any other Google APIs. If you haven't, click Select a Project in the top-left corner and then create a new project. No Project Selected Project Selected 2. Go to Library and search for Google Identity. Click on "Cloud Identity" and then click on 'enable' Adding Credentials 3. Go to Credentials -> OAuth consent screen and fill out the form. 4. Go to Credentials -> Credentials. Click the Create credentials button and choose OAuth client ID from the dropdown. Create Credentials Button Choose Web application as the type, and for the Authorized redirect URIs field, enter the value shown in your AdminCP. Credentials Form Adding to the ACP You will see a screen displaying a client ID and client secret. Issued Credentials Back in your AdminCP, fill in the form, using the Client ID and Client Secret that you just obtained. Entering details in Invision Community Updating from google+ Updating from the google+ API due to the replacing of these APIs by google can be done in the following manner 1. Go to the Google APIs Console and sign in with your Google account and select your google project. 2. Select to remove the google+ API 3. Go to Library and search for Google Identity. Click on "Cloud Identity" and then click on 'enable' No further steps are required to switch to the new API as you already have credentials created from the previous setup.
-
You can link two (or more) Invision Community installations together to allow users to sign into one community using their credentials from another. All communities that you want to link will need to be running Invision Community 4.3 or higher. Server and Client You will need to decide which community is the "Server" (sometimes called the "master") which is the one whose credentials will be used for the login. All the other communities will be the "Clients" (sometimes called the "slaves"). Step One: Set up the Server On the community which will be the Server, go to AdminCP -> System -> REST & OAuth, and click the "Create New" button to create a new OAuth client. For the client type, choose "Another Invision Community". Setting up the Server After saving this form, you will see a Client Identifier and Client Secret. You will use these two values to fill out the form on the Client community. Getting the Client Identifier and Client Secret Step Two: Set up the Client Now on the community which will be the Client(s) go to AdminCP -> System -> Login & Registration, click "Create New" and choose the "Another Invision Community". You will need the Client Identifier and Client Secret from Step One. Setting up the Client Once you have saved this form, set up is complete and should be able to log in! Need more communities? If you are setting up more than two communities, run through this process for each of the Client communities.
-
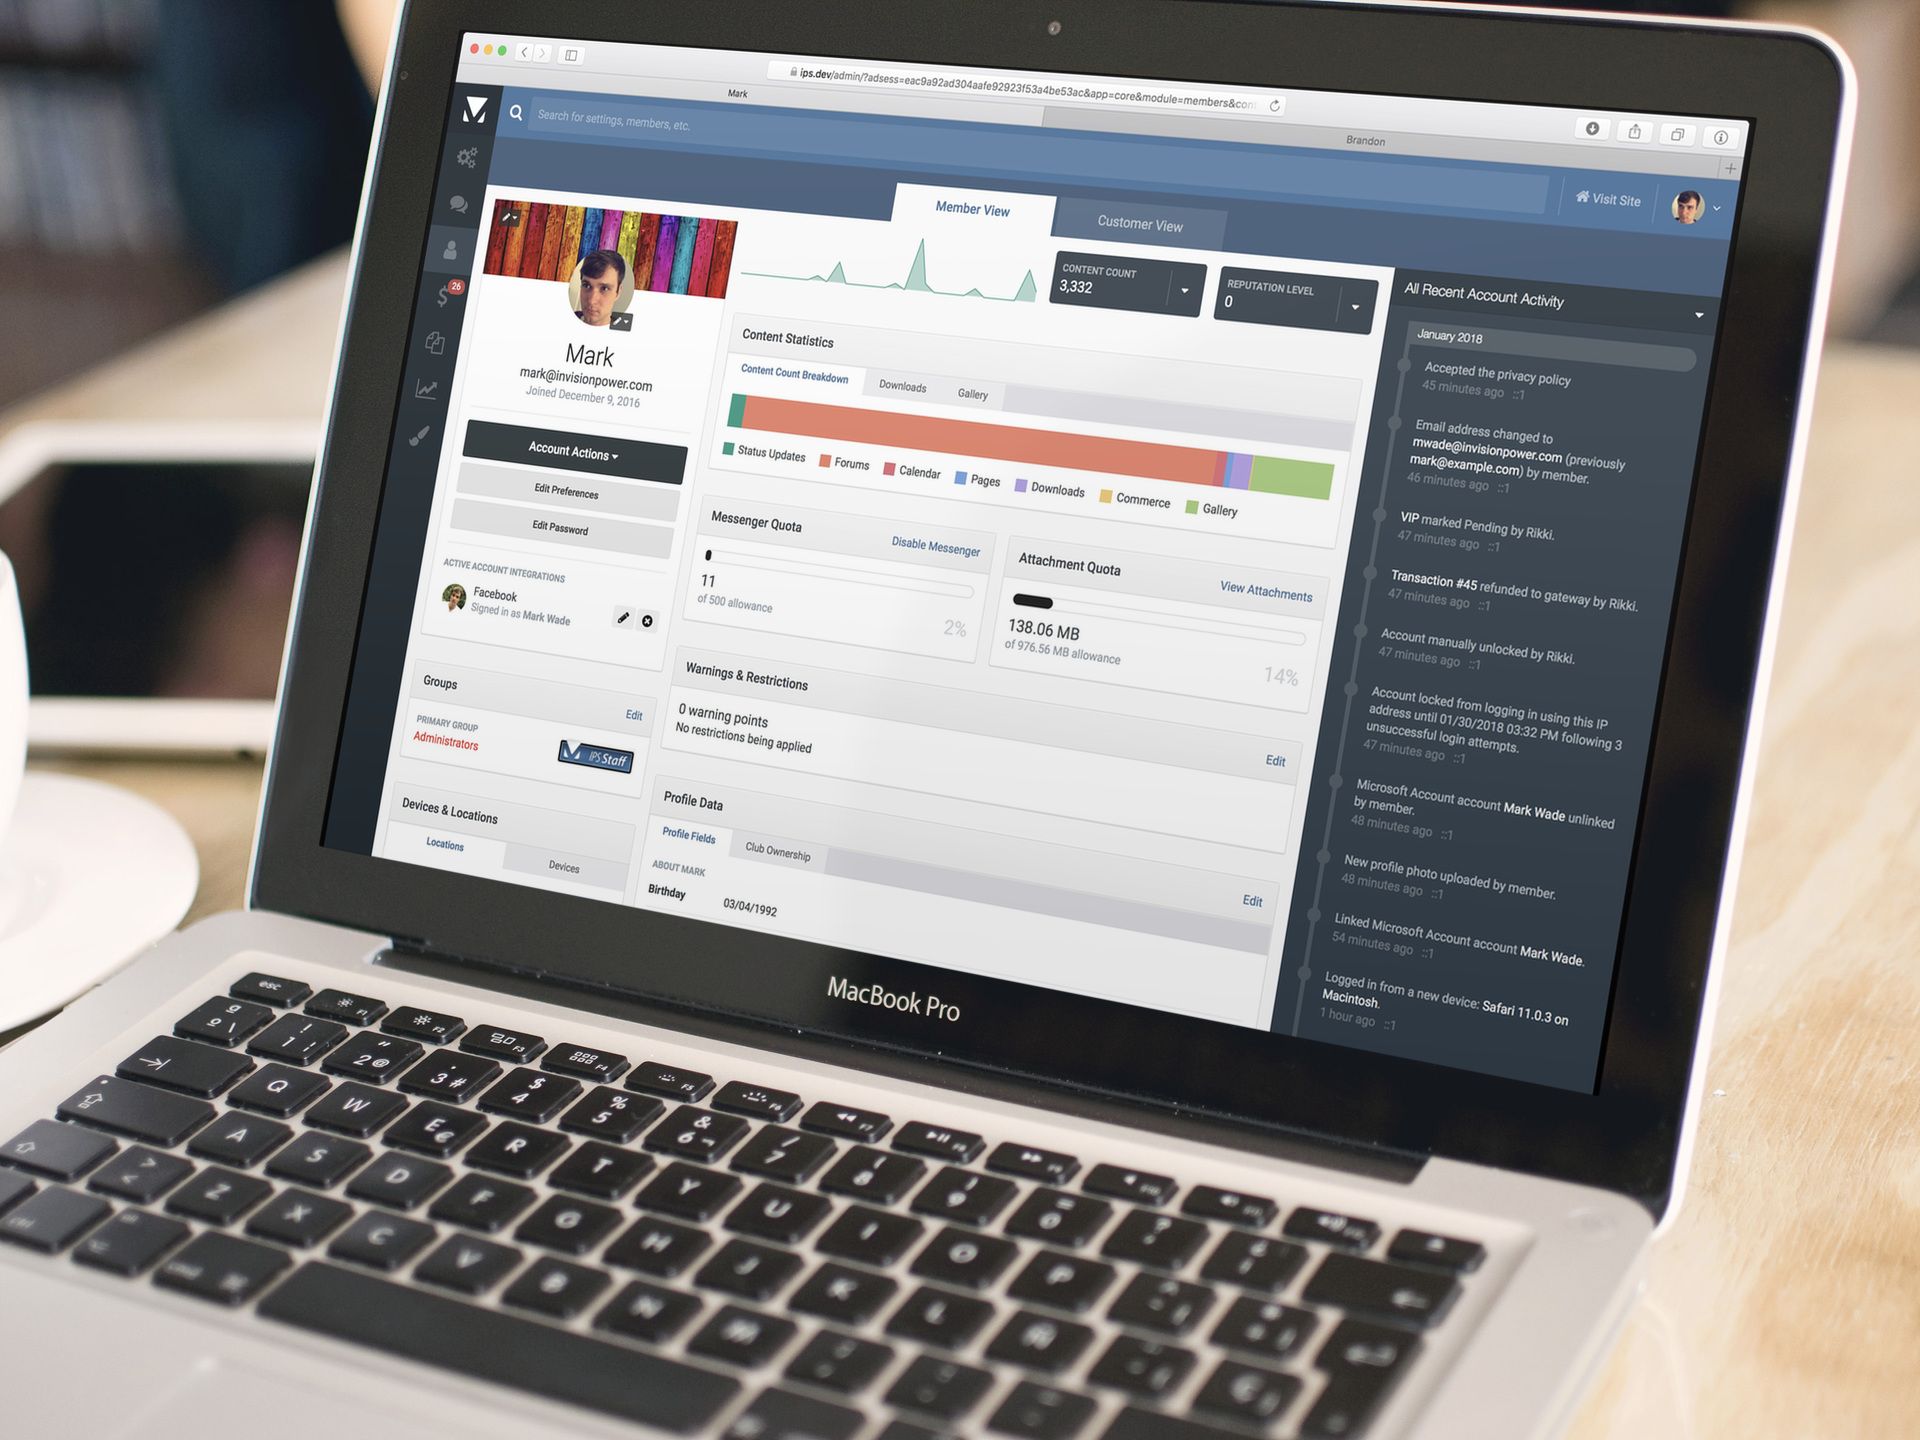 Viewing and editing a member is probably one of the most frequently used features of the AdminCP. With the design unchanged for many years, and the tabbed interface starting to grow unwieldy, it was due for some love. We have not only dramatically improved the design but added many new features. New AdminCP Member Page Let's look at some of the improvements: Easy Toggle between Member and Customer View If you have Commerce installed, you can now toggle between "Member View" (which shows the screen above) and "Customer View" (which shows the current customer page in Commerce with the user's purchases, invoices, etc.). This makes it much easier to view all of a member's information in one place. If you don't have Commerce installed, the top tab bar will not show. Basic Information The pane in the top-left shows the member's basic information like name, email address and photos. You can now reposition a member's cover photo and crop the profile photo (functions previously not available in the AdminCP). To change the display name or email address, you just click and hold on the information and a textbox appears. The buttons below allow you to merge, delete, sign in as, and edit the preferences or password for the member. Basic Member Information Pane In addition, this pane lists any social networks the user is logged in with. It shows you the member's profile photo and profile name on that network (for example in this screenshot, it is showing my Facebook profile's photo and name) and for many networks you can click on this to be taken directly to their Facebook/Twitter/etc profile. You can also edit the syncing options for the method and unlink the accounts, features which weren't available previously. If you have Commerce installed, there is also an indicator if the user has an active subscription. A member with an active subscription Alerts If a member is validating, banned, flagged as a spammer, or locked, a large banner will display drawing your attention to this. For validating and banned, it will explain exactly what the status is (for example, if they haven't responded to the validation email yet versus they are awaiting admin approval, or if they have been banned manually versus are in a group without permission to access anything). A member that has been locked Other possible alerts Locations & Devices This pane shows you, on a map, all of the locations the user has been when using the community (based on their IP address) as well as the IP address they used to register and most recently. IP Address Locations While the devices tab shows the most recently used devices. Recently Used Devices Content Statistics Right in the middle of the profile you can see some statistics about the member's activity. This includes: A sparkline graph of their recent content. Their content count and reputation count (with tools to manually change or rebuild). A breakdown of the amount of content they have made across all applications. A visual indication of how much of their messenger and attachment storage they have used. If Gallery and Downloads are installed, the existing statistics overview provided by these apps are also available here. Content Statistics Warnings & Restrictions This block shows recent warnings on the account, and also highlights if any restrictions (i.e. content moderation, restricted from posting, or application-level restrictions) are being applied, which previously was difficult to see at a glance. Warnings & Restrictions Block for an account which has content moderation in effect Account Activity On the right is a pane which shows all of the latest account activity. While this was available in previous versions (called "Member History") we have made some significant improvements: The number of things that get logged has been significantly expanded. We now log photo changes, group changes, when a new device is used to login, if an account is locked (by failed logins or failed two factor authentication attempts) or unlocked, password/email/display name changes, when a user links or unlinks a social network login method, initial registration and validation, merges, being flagged/unflagged as a spammer, receiving/acknowledging/revoking a warning, restrictions being applied, two factor authentication being enabled/disabled/changed, an OAuth token being issued if Invision Community is being used as an OAuth Server, enabling/disabling receiving bulk mails, and accepting the privacy policy / terms and conditions, as well as all of the Commerce-related information that is already logged. Much more information is now shown such as who made the change (i.e. an admin, the user themselves, or if it was changed by the REST API or syncing with a social network) and how the change was made (for example, for a password change - if the user used the "Forgot Password" tool or changed it in their Account Settings) and what the data was before and after. This includes being aware of if the change was made by an admin after using the "Sign in as User" tool. You can now filter what information you are seeing to quickly find what you are looking for. Recent Account Activity Extensibility The new profile has been designed with extensibility in mind. Third party developers can easily add new blocks our even entire new tabs. Any apps/plugins which are currently adding a tab to the "Edit Member" form will retain backwards compatibility with their tab continuing to appear when clicking the "Edit Preferences" button in the basic account information pane.
 -
 Videos are everywhere. We shoot them on our smart phones, share them to social media, messengers and more. Up until now, the only way to share a video to Invision Community was to use a service like YouTube or Vimeo. If you uploaded a video file it would be treated like an attachment, and if the user clicked the link it would download it to their computer. In Invision Community 4.3 we've improved this. Now if you upload a video file (mp4/3gp/mov/ogg/ogv/mpg/mpeg/flv/webm/wmv/avi/m4v), it will embed similarly to an image. Uploading a video When viewing an uploaded video, if it is in a format that the user's browser and platform natively supports, it will show an embedded player. This will have all of the features supported by the operating system - for example, almost all browsers support fullscreen, and Safari supports Airplay and picture in picture. An uploaded video If the video is in a format not supported, it displays exactly as it does now - as a download link. An uploaded video in a browser without playback support for that format
 -
 We released news of Clubs just under a year ago for Invision Community 4.2 and it has been the best received feature to date. Clubs opens up new ways to run your community by allowing members to create sub-communities away from the central forum area. Since the feature was released, we've collated an immense amount of feedback on the feature. Here's what we're improving for Invision Community 4.3. Paid Club Memberships If you have Commerce installed on your community, 4.3 adds the ability for members to create paid clubs. Users wishing to join the club will be required to pay a membership fee (which can be one off or recurring) which will be paid to the club owner, minus any commission you want to keep for the site. You can choose which groups can create paid clubs. Paid Club Settings If enabled, the club directory will show the price for membership in each club. Club directory with paid clubs The process for joining works a little differently depending on the type of club... For open clubs, the user will immediately be prompted to pay the joining fee. Once they have paid, they are added to the club as normal. For closed clubs, the user will need to request to join as normal. Once they have been accepted to join the club, they will then be able to pay the membership fee, after which they'll be added to the club. For private and read-only (a new type in 4.3, which we'll talk about below) users have to be invited to join the club Public clubs have no membership, and so cannot be paid. Joining a paid club (a closed club in this screenshot) Paid club after request to join has been accepted Paying for club membership Club leaders can also waive the membership fee, allowing certain users to join the club for free. Waiving fee when approving request to join Waiving fee when inviting members Waiving renewal fees on an existing member If a member fails to pay their renewal charge, they are moved into an "expired" state. The club leaders can see the status and renewal date for all members, and use the filter tools to just see active or expired members. Club members management Paying out membership fees works just as it does with paid files in Downloads. Users receive the amount as account credit. If enabled, they can then request a payout of this via PayPal or a manual payout method you want to use. Viewing an invoice in the AdminCP where some payment has been given to a member Viewing account credit with options to withdraw funds Club content throughout the community Currently content in clubs is only visible within the club itself. In 4.3 a new setting allows you to show the content from clubs throughout the community - for example, if a club contains a forum, that forum can show in the main forum list. Club forums showing on main forum list This is a single toggle: if enabled, all content from clubs that each user has joined will show throughout the community, appearing below the normal categories/etc in that application. New Club Type: Read Only In addition to Open, Closed, Private and Public, we have added a new club type in 4.3: read only. In a read only club, everyone can (without joining) view everything in the club, but cannot participate unless they are invited by a club leader. Following Users can now follow a club, and will then receive notifications about all new content in the club - the same as if they followed every content area in the club. List View In addition to the current grid layout of clubs, there is a new list-style. Clubs List View The admin can choose which views are available and what the default should be. AdminCP Approval You can now filter the list of clubs in the AdminCP to clubs requiring approval and approve clubs from within the AdminCP. Approving clubs in AdminCP Deleting Content Areas Club leaders can now delete content areas within their clubs. This can be useful if, for example, the leader added a club feature by mistake. Content areas can only be removed if there is no content within it, or if you have granted club leaders the ability to delete content in their clubs (since they would be able to empty it). Ability to remove features from clubs Other Minor Tweaks You can now set per-group the maximum number of clubs a member in that group can create. A member invited to join a club can now delete the invitation if they do not want to accept it (rather than just ignoring it).


