


On the front end of your community, moderators can manage and moderate content based on the permissions you’ve assigned to them. Moderation can take place at both the individual item level and at the container level. Moderation can be something actioned by an individual, or an automated action.
For example, a moderator might moderate individual posts directly from within a topic, or manage entire topics from the forum view. A content item may have to be approved, as it has hit a predetermined action such as a link has been added, or our AI tools have flagged this as potential spam.
Content Moderation
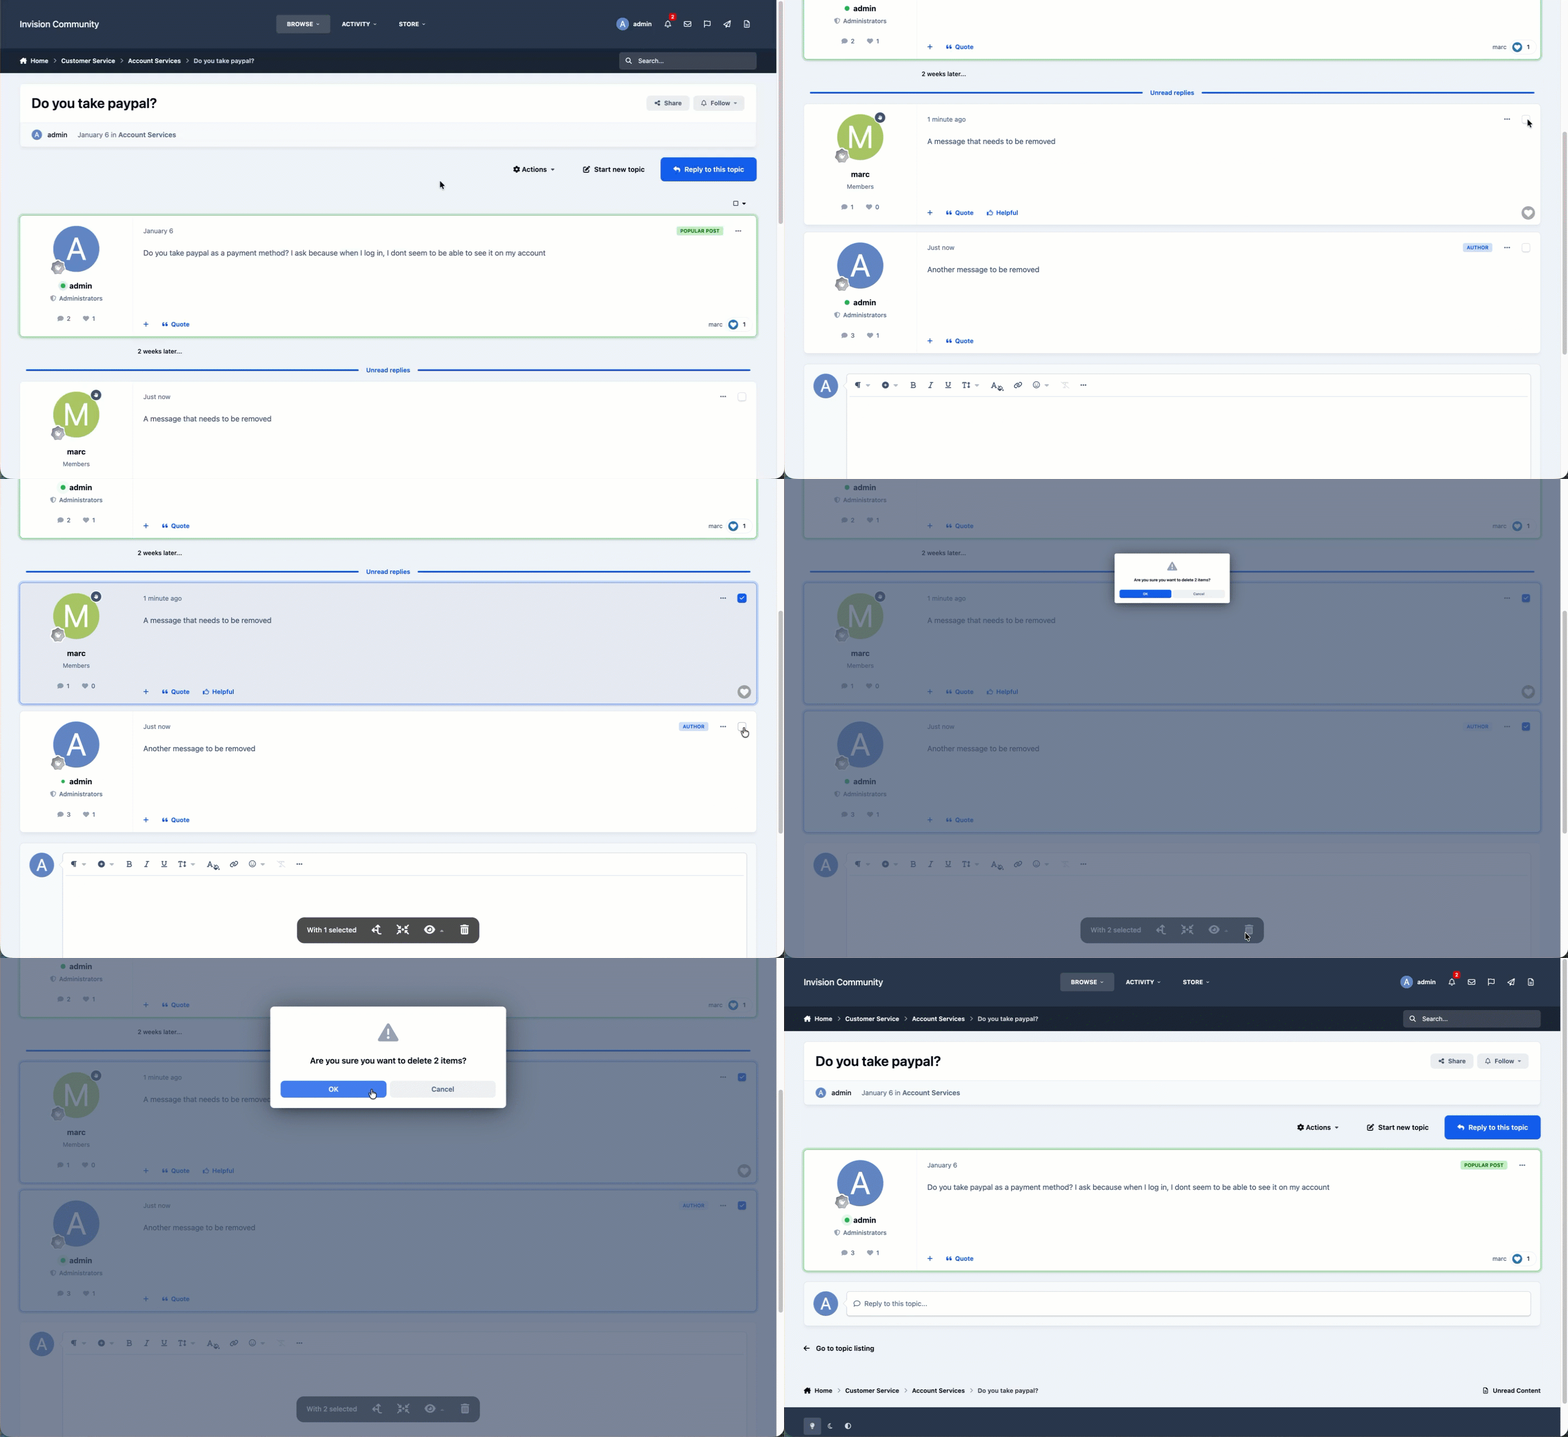
While viewing a post or topic, hovering over the item you wish to moderate will reveal a checkbox in the top-right corner, if you have permission. Selecting this checkbox adds the item to your current moderation selection.
Once at least one item has been selected, the moderation menu will appear at the bottom of the screen. From there, you can choose the action you want to apply to the selected item or items.
This process is demonstrated i below.
Main Moderation Tools
In other areas of the community, moderator actions may be accessed through a menu button instead. For example, when viewing a Gallery image, moderation options are available from the actions button shown here.
Tip
Within each item of content, you’ll find a moderator actions menu. From here, moderators can perform the relevant moderation actions and also view the moderation history for that specific item.
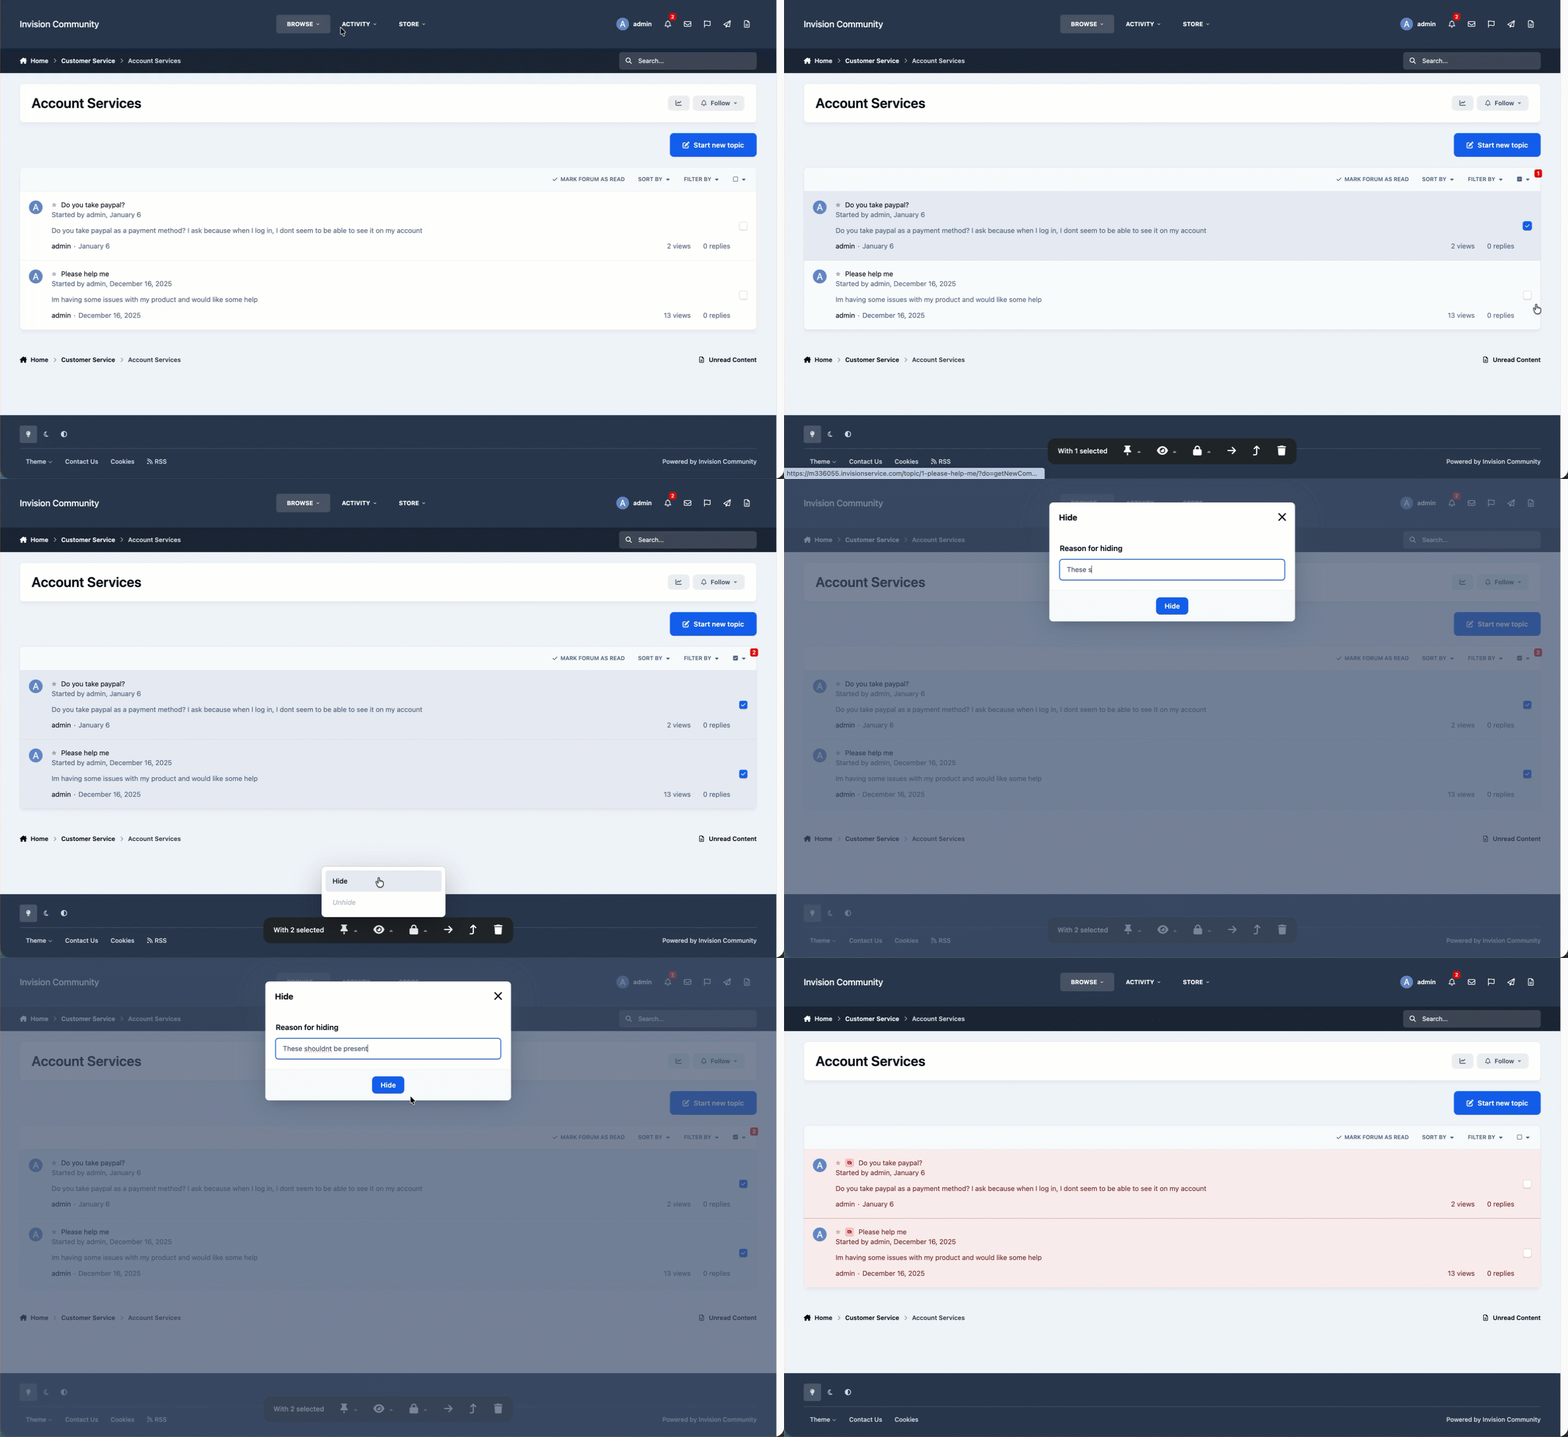
Depending on where you are within the system, the moderation menu will present different available actions. In the example below, posts within a topic are being hidden from end users using the moderation tools.
Hiding Content
Post approval
There may be occasions where you need to enable approval for replies within a specific topic. This option can be selected from the 'Moderation Actions' menu.
Enabling reply approval can be particularly useful in sensitive or high-risk discussions, such as those involving contentious topics, vulnerable users, or situations where misinformation or inappropriate responses may be a concern. It allows moderators to review replies before they are made public, helping ensure that content remains respectful, accurate, and in line with your community guidelines.
Once enabled, each new reply will require moderator approval before it becomes visible to other members, giving your moderation team greater control over how discussions develop.
Community/Crowd Moderation
As your community grows and becomes more active, keeping up with all new content and member reports can become increasingly challenging. To help manage this, Invision Community includes an automatic moderation feature that can take action when content is reported by members.
This feature uses member reports to automatically remove potentially objectionable content from public view, helping maintain community standards without requiring immediate moderator intervention.
As an administrator, you define the thresholds that trigger these actions. For example, you might decide that a post should be automatically hidden once it receives five reports.
By leveraging automatic moderation, you reduce the workload on your moderation team while also enabling a form of community-driven moderation, allowing trusted members to help keep the community safe, respectful, and welcoming.
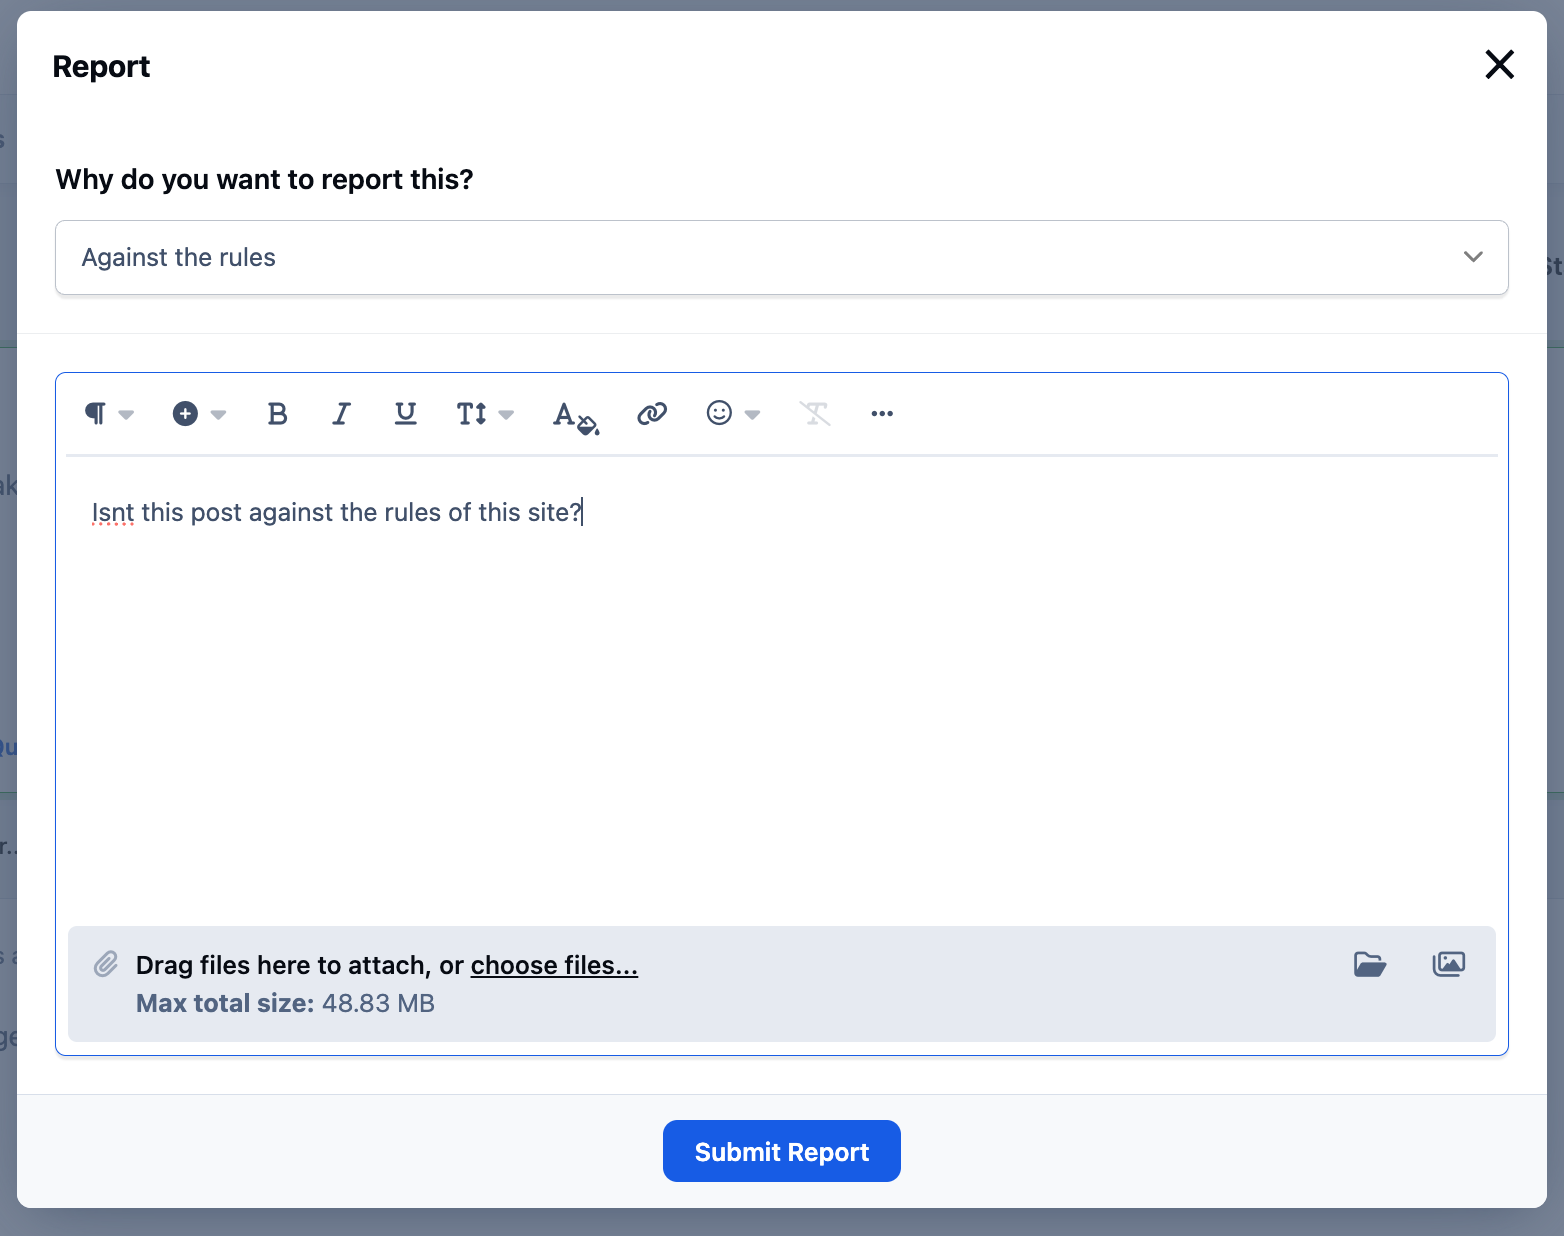
When a member reports a piece of content, they can select a report type, such as Spam or Offensive. These report types can be configured to count toward your automatic moderation thresholds.
Once the defined threshold is reached, the content is automatically hidden from public view, helping address issues quickly while moderators review the report.
Reporting an Item
This threshold can be set up by creating rules in the Admin CP as shown below
Report Types
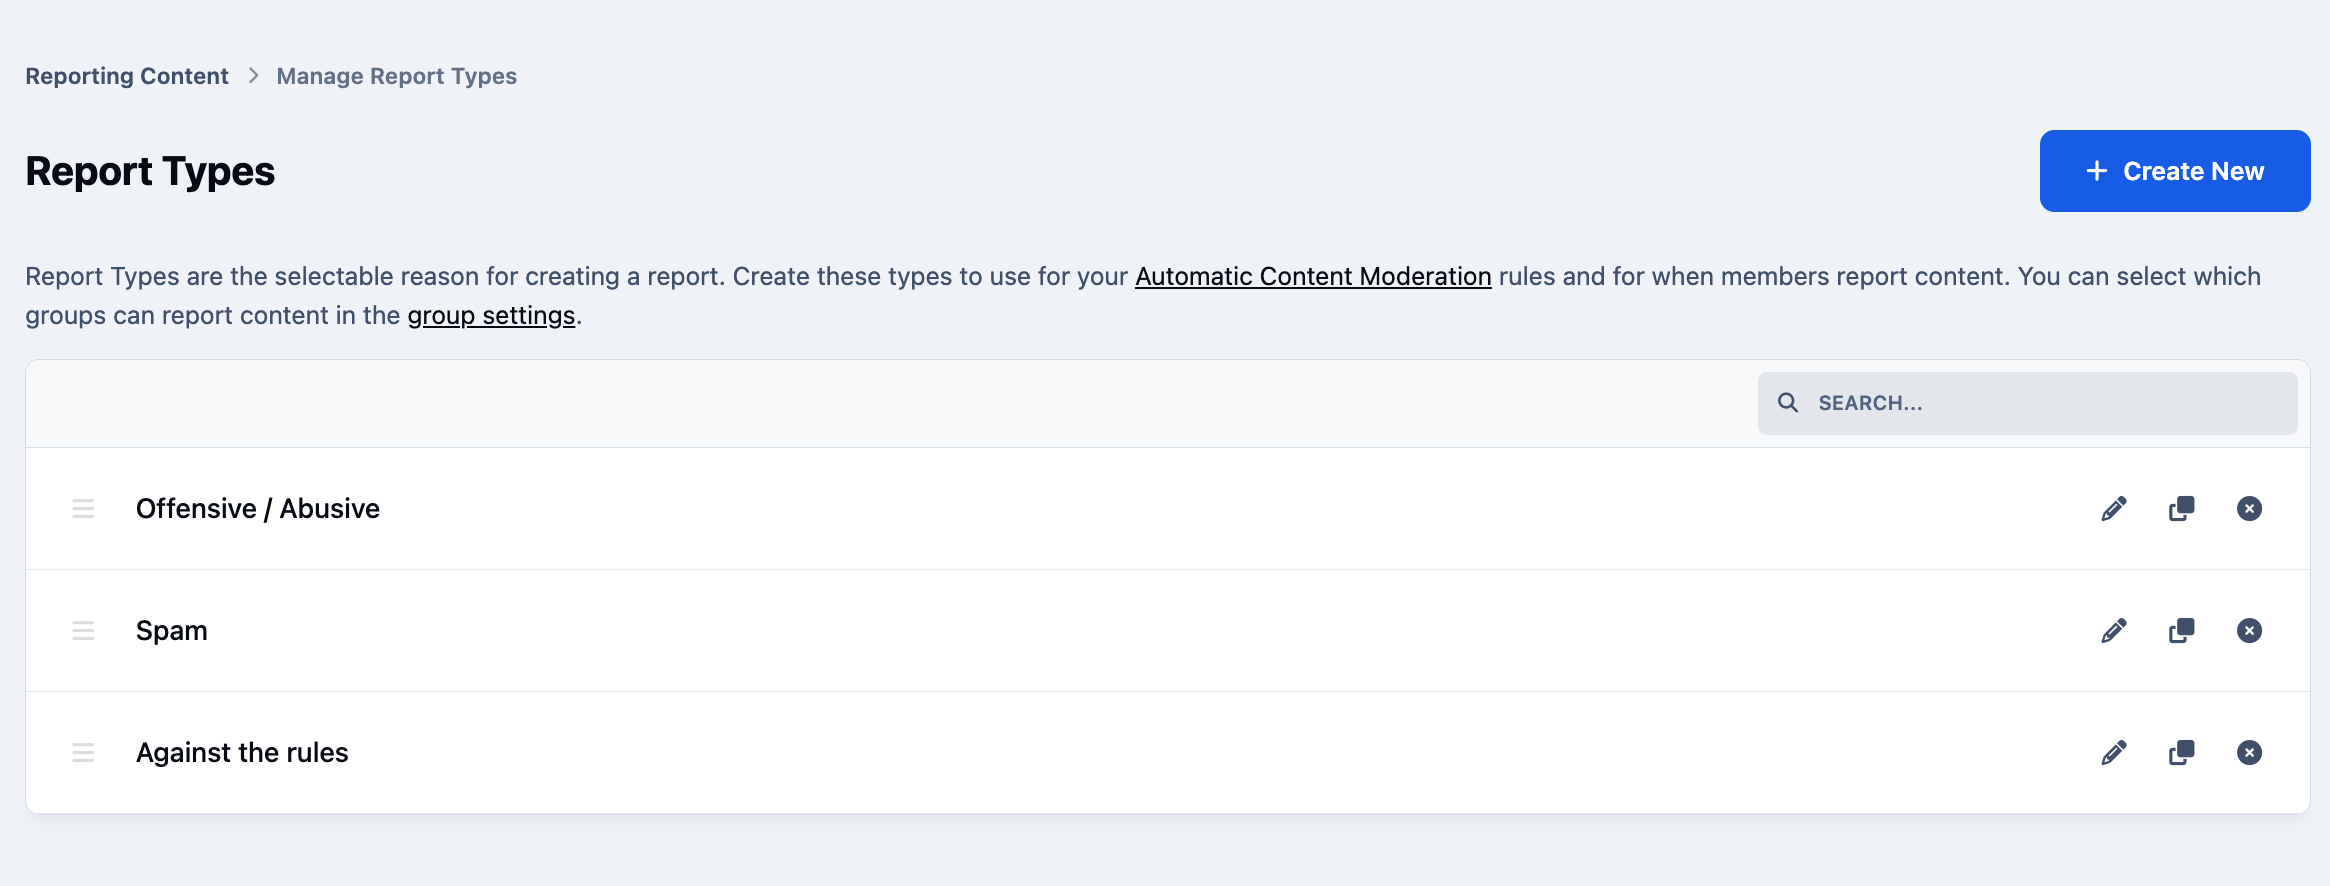
Before you can create your own automatic moderation rules, you’ll need to set up one or more report types. These define the categories members can choose from when reporting content.
Report types can be created from the following location in the Admin CP
Members → Content Moderation → Automatic Moderation → Manage Report Types
Once at least one report type has been created, you can then move on to configuring the rules for automatic moderation.
List of Report Types
Rules
At the heart of the automatic moderation system are its rules. These rules determine what actions are taken when content is reported by members.
You can create and manage custom automatic moderation rules from the following location in the Admin CP
Members → Content Moderation → Automatic Moderation
Automatic Moderation Rules
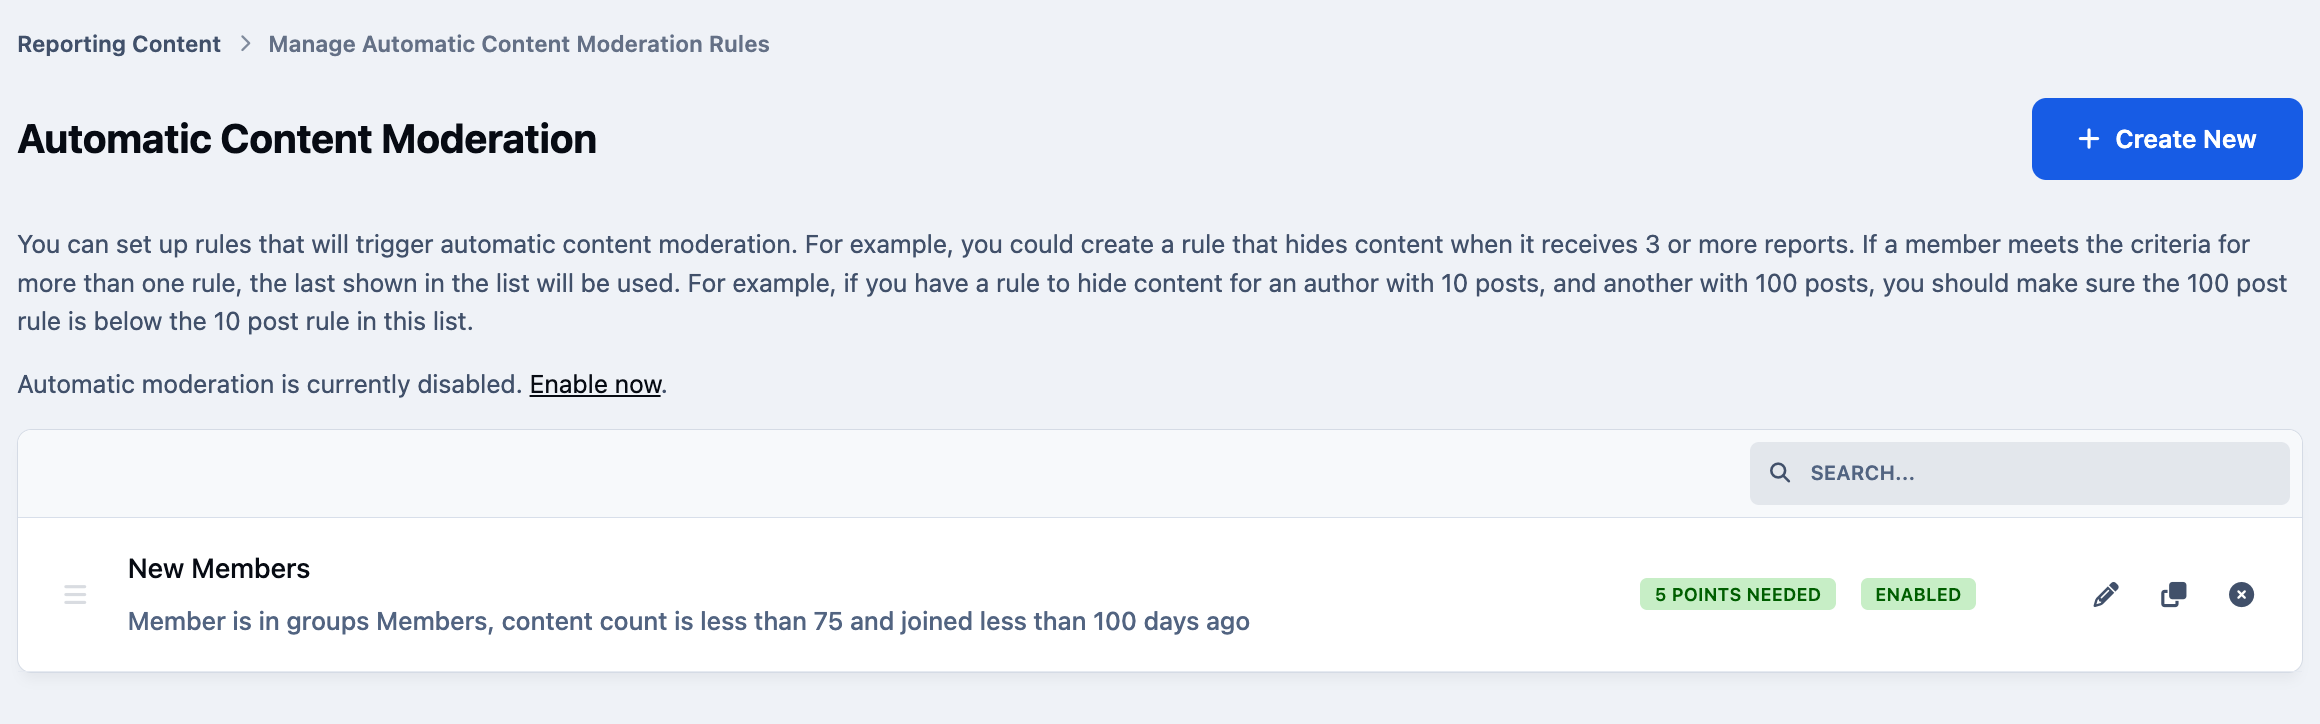
For example, you might decide that content posted by newer members should be hidden more quickly. A member with fewer than 10 posts may only require 5 reports before their content is automatically hidden.
On the other hand, you may wish to apply a higher threshold for more established members, where there is a greater level of trust. In this case, you could create an additional rule stating that a member who joined over a year ago and has more than 500 posts requires 10 reports before their content is hidden.
Automatically Hidden Content

These scenarios can be easily handled using the rules system. All rules are evaluated automatically, and the system will apply the most appropriate rule for the member based on the criteria you’ve defined.
Notifications
Once a piece of content receives enough reports to meet the defined threshold, it is automatically hidden from public view. This allows moderators to review and handle the content at an appropriate time, without the reported item continuing to cause issues for other members.
When this happens, a notification is sent to all moderators who have opted in to receive notifications. These alerts appear directly within the notifications center, and/or via email, ensuring moderators are made aware of the action without needing to constantly monitor reports.
Reports Centre Notifications
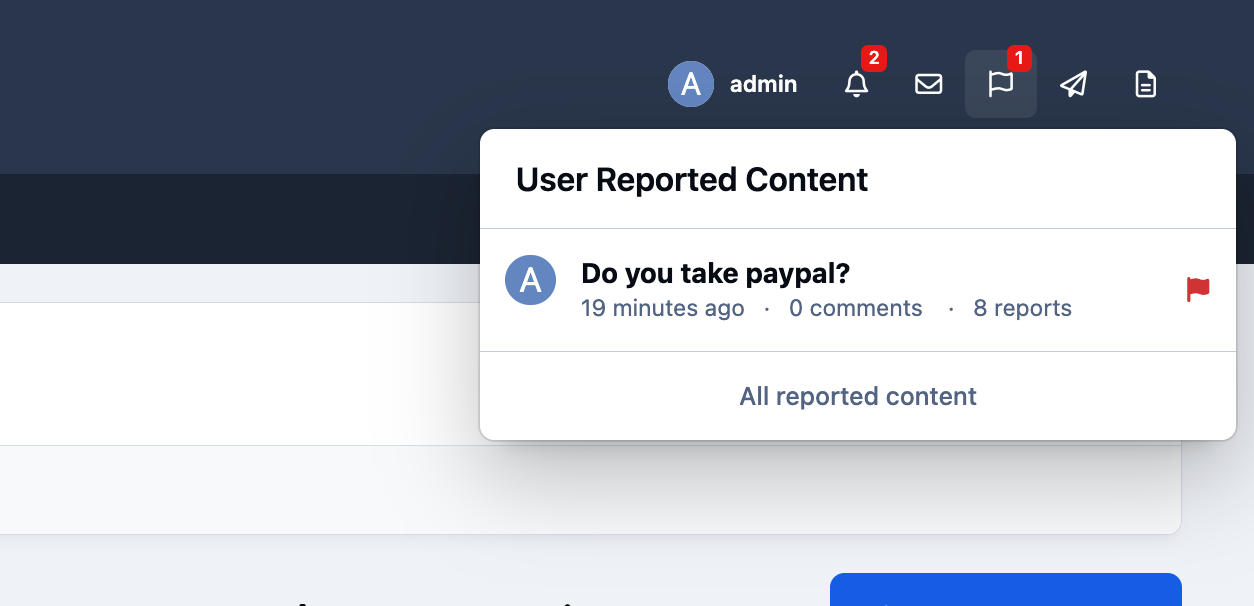
Of course, a moderator may review the content and decide that it does not violate any rules, in which case they can choose to unhide it.
Once a piece of content has been unhidden by a moderator, it will not be automatically hidden again by the automatic moderation system.
Abuse Prevention
The system only counts one report per unique member toward the reporting threshold. This prevents a single member from reporting the same item multiple times to artificially trigger automatic moderation, as each member is only counted once.
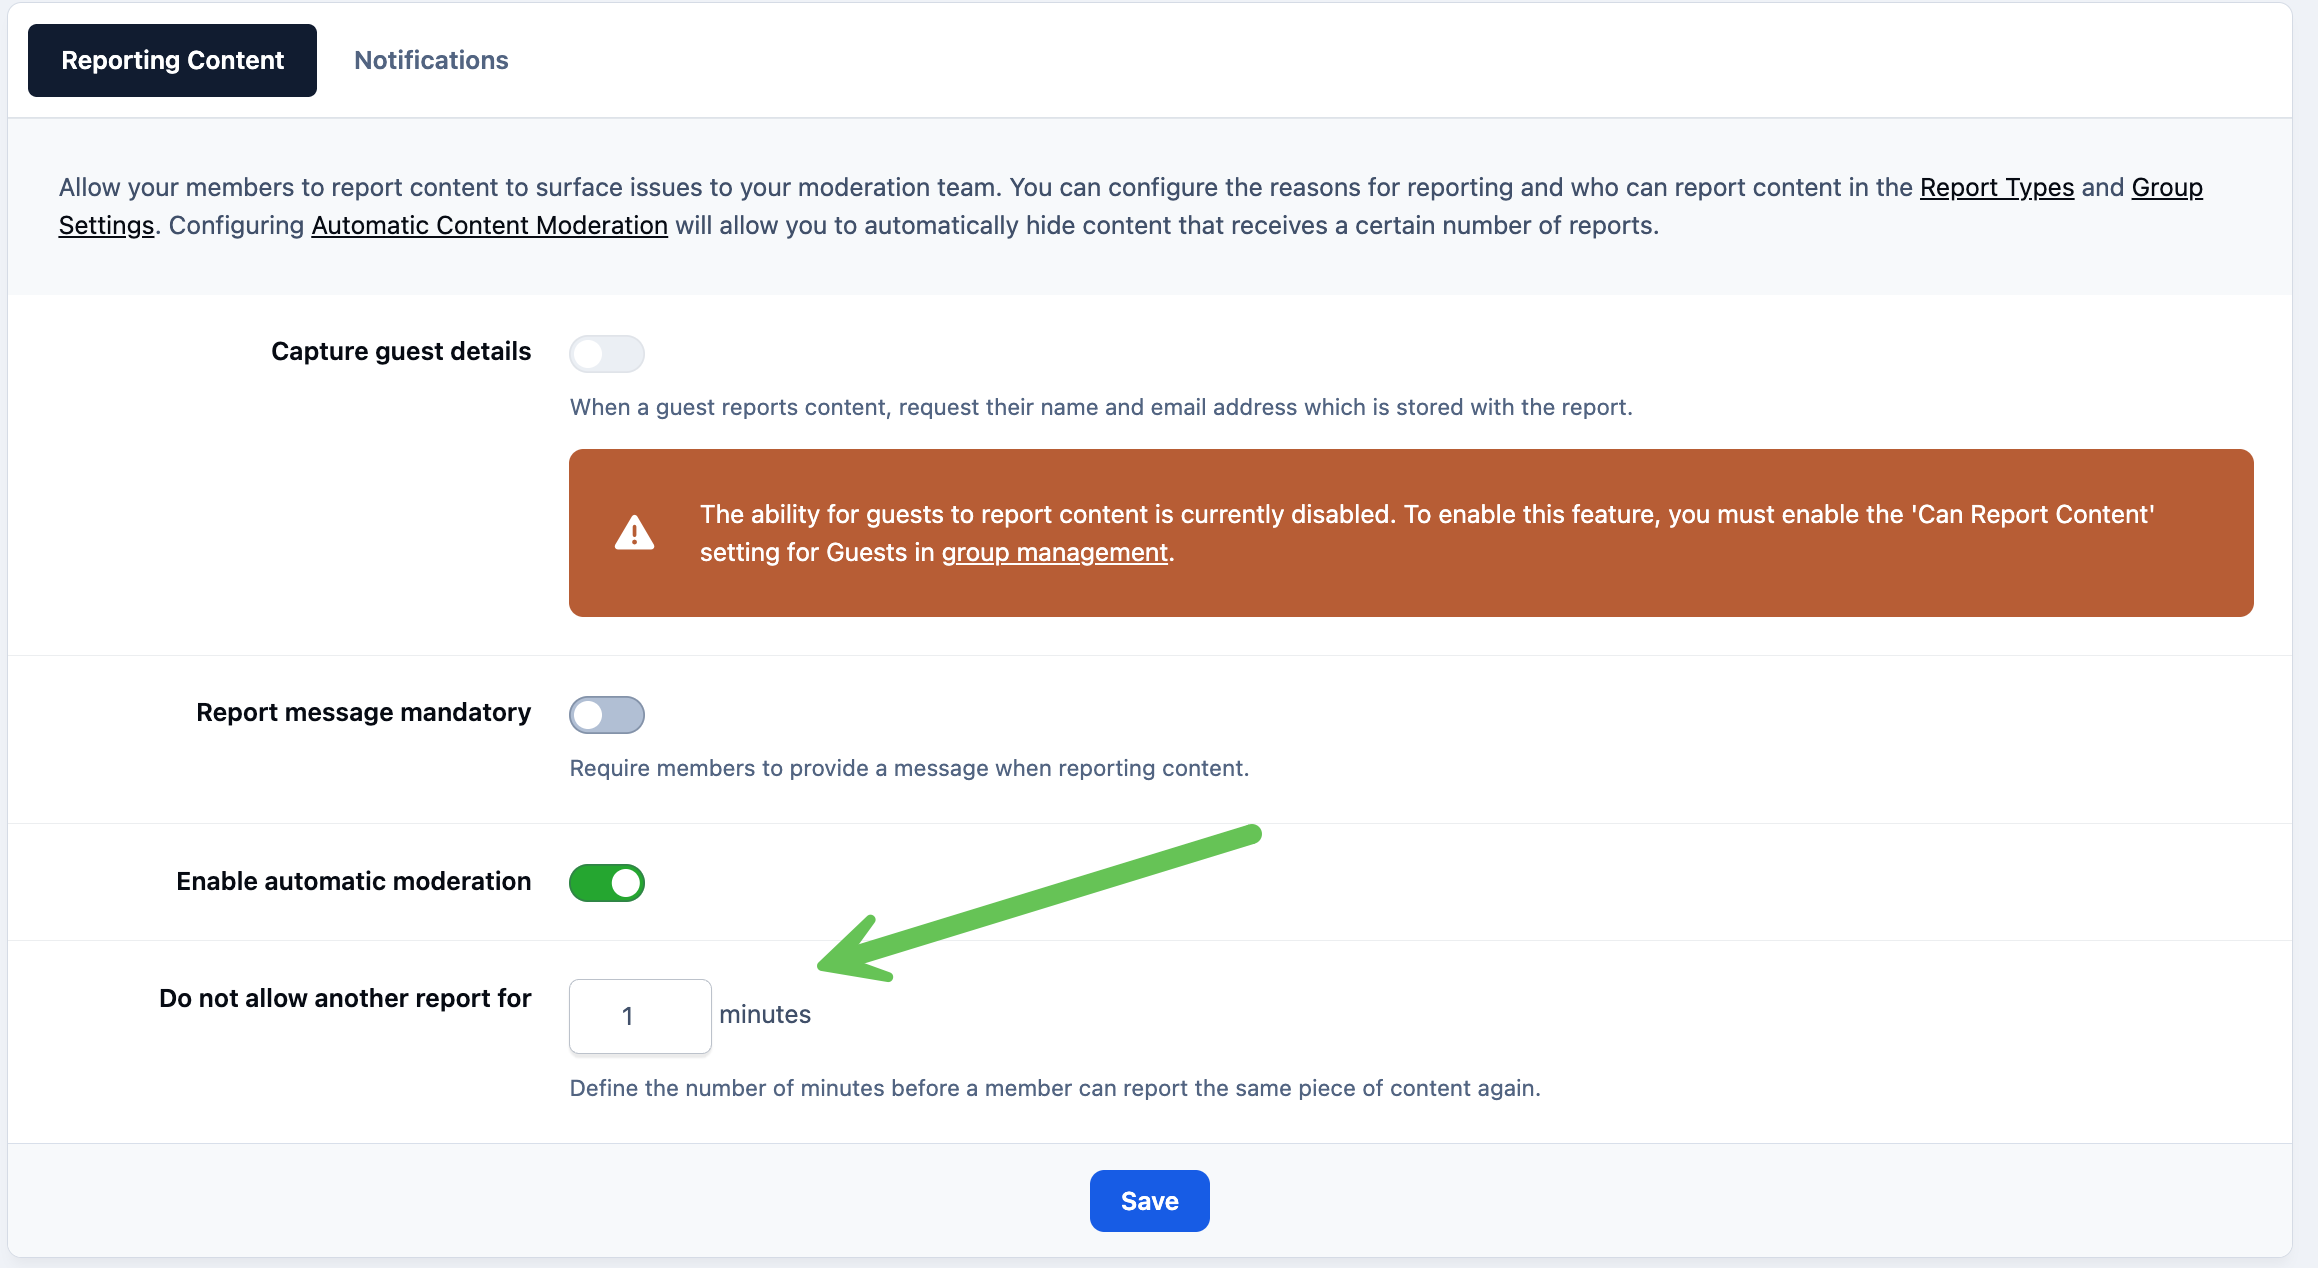
You can also configure a time limit between reports on the same item. This helps prevent members from repeatedly reporting a single piece of content in quick succession.
These settings can be managed from the following location in the Admin CP:
Members → Content Moderation → Automatic Moderation → Settings
Setting to Prevent Reporting Abuse
Clicking again will give the user the option to delete that report if they wish to do so.
Recommended Comments