


A popular way to monetize your community is by offering paid subscriptions in exchange for benefits, either on your site or even outside of it. The Commerce application makes this easy by providing a built-in subscriptions system.
Please note that this section is intended as a general walkthrough to demonstrate how subscriptions work. For more detailed information about Commerce and its full range of features, you can refer to the guides available under 'Features' in the navigation on the left.
Introduction
In this guide, we’ll create a subscription system for our fictional site that allows members to pay for additional benefits. These will include increased attachment storage space, access to an exclusive forum, and the ability to create private or restricted Gallery items.
We’ll set up three subscription tiers, with each higher tier offering additional features and expanded access.
Bronze Subscription
Silver Subscription
Gold Subscription
Creating Groups
The first step is to create new member groups that will correspond to the subscription tiers we’re setting up. In this example, we’ll create Bronze, Silver, and Gold groups.
For detailed instructions on how to create and configure member groups, please refer to the relevant Member Groups guide in the 'Members & Groups' section of the menu on the left.
On the creation of these groups, they will have the same basic settings of the member group, with the exception of the following items.
Bronze - Set "Total Maximum Storage" to 1000kb (Content Tab). Switch on "Can create private albums?"
Silver - Set "Total Maximum Storage" to 5000kb (Content Tab). Switch on "Can create private albums?"
Gold - Set "Total Maximum Storage" to 5000kb (Content Tab). Switch on "Can create private albums?", and also "Can create restricted access albums?"
Can't See Gallery?
If you cant see the gallery tab, its likely you do not have the gallery application installed or activated. You can do this from System → Site Features → Applications
Sorting Out Permissions
Now that the member groups have been created, the next step is to create a new forum for subscribers. In this example, we’ve named it Subscriber, but you can choose any name that suits your community.
If you need a refresher on creating new forums, please refer to the relevant forums guide within the features section of our guides menu for step-by-step instructions.
{link here}
When creating this forum, make sure to configure the permissions so that only members of the Bronze, Silver, or Gold groups can access it.
If you’d like more information on how permissions work and how to configure them, please refer to the permissions guide.
{link here}
Creating Subscriptions
Now we’re ready to create subscriptions for our new member groups. Our goal is to:
Allow members to purchase a Bronze, Silver, or Gold subscription
Automatically promote them to the relevant group upon purchase
To create the first subscription, navigate to the following location in the Admin CP:
Commerce → Subscriptions → Subscription Plans
Click 'Create New' in the top-right corner.
In the name field, enter 'Bronze Subscription'.
We’re creating a monthly subscription, so we’ll configure:
An initial charge of $5
A renewal price of $5 per month
To do this, enable the 'Renews 'option. This allows the subscription to automatically charge on a recurring basis.
Once configured, your pricing settings should reflect:
$5 initial purchase
$5 renewal every 1 month
At this stage, you should have the basic subscription plan structure in place and ready to continue configuring the remaining options.
Basic Subscription Settings
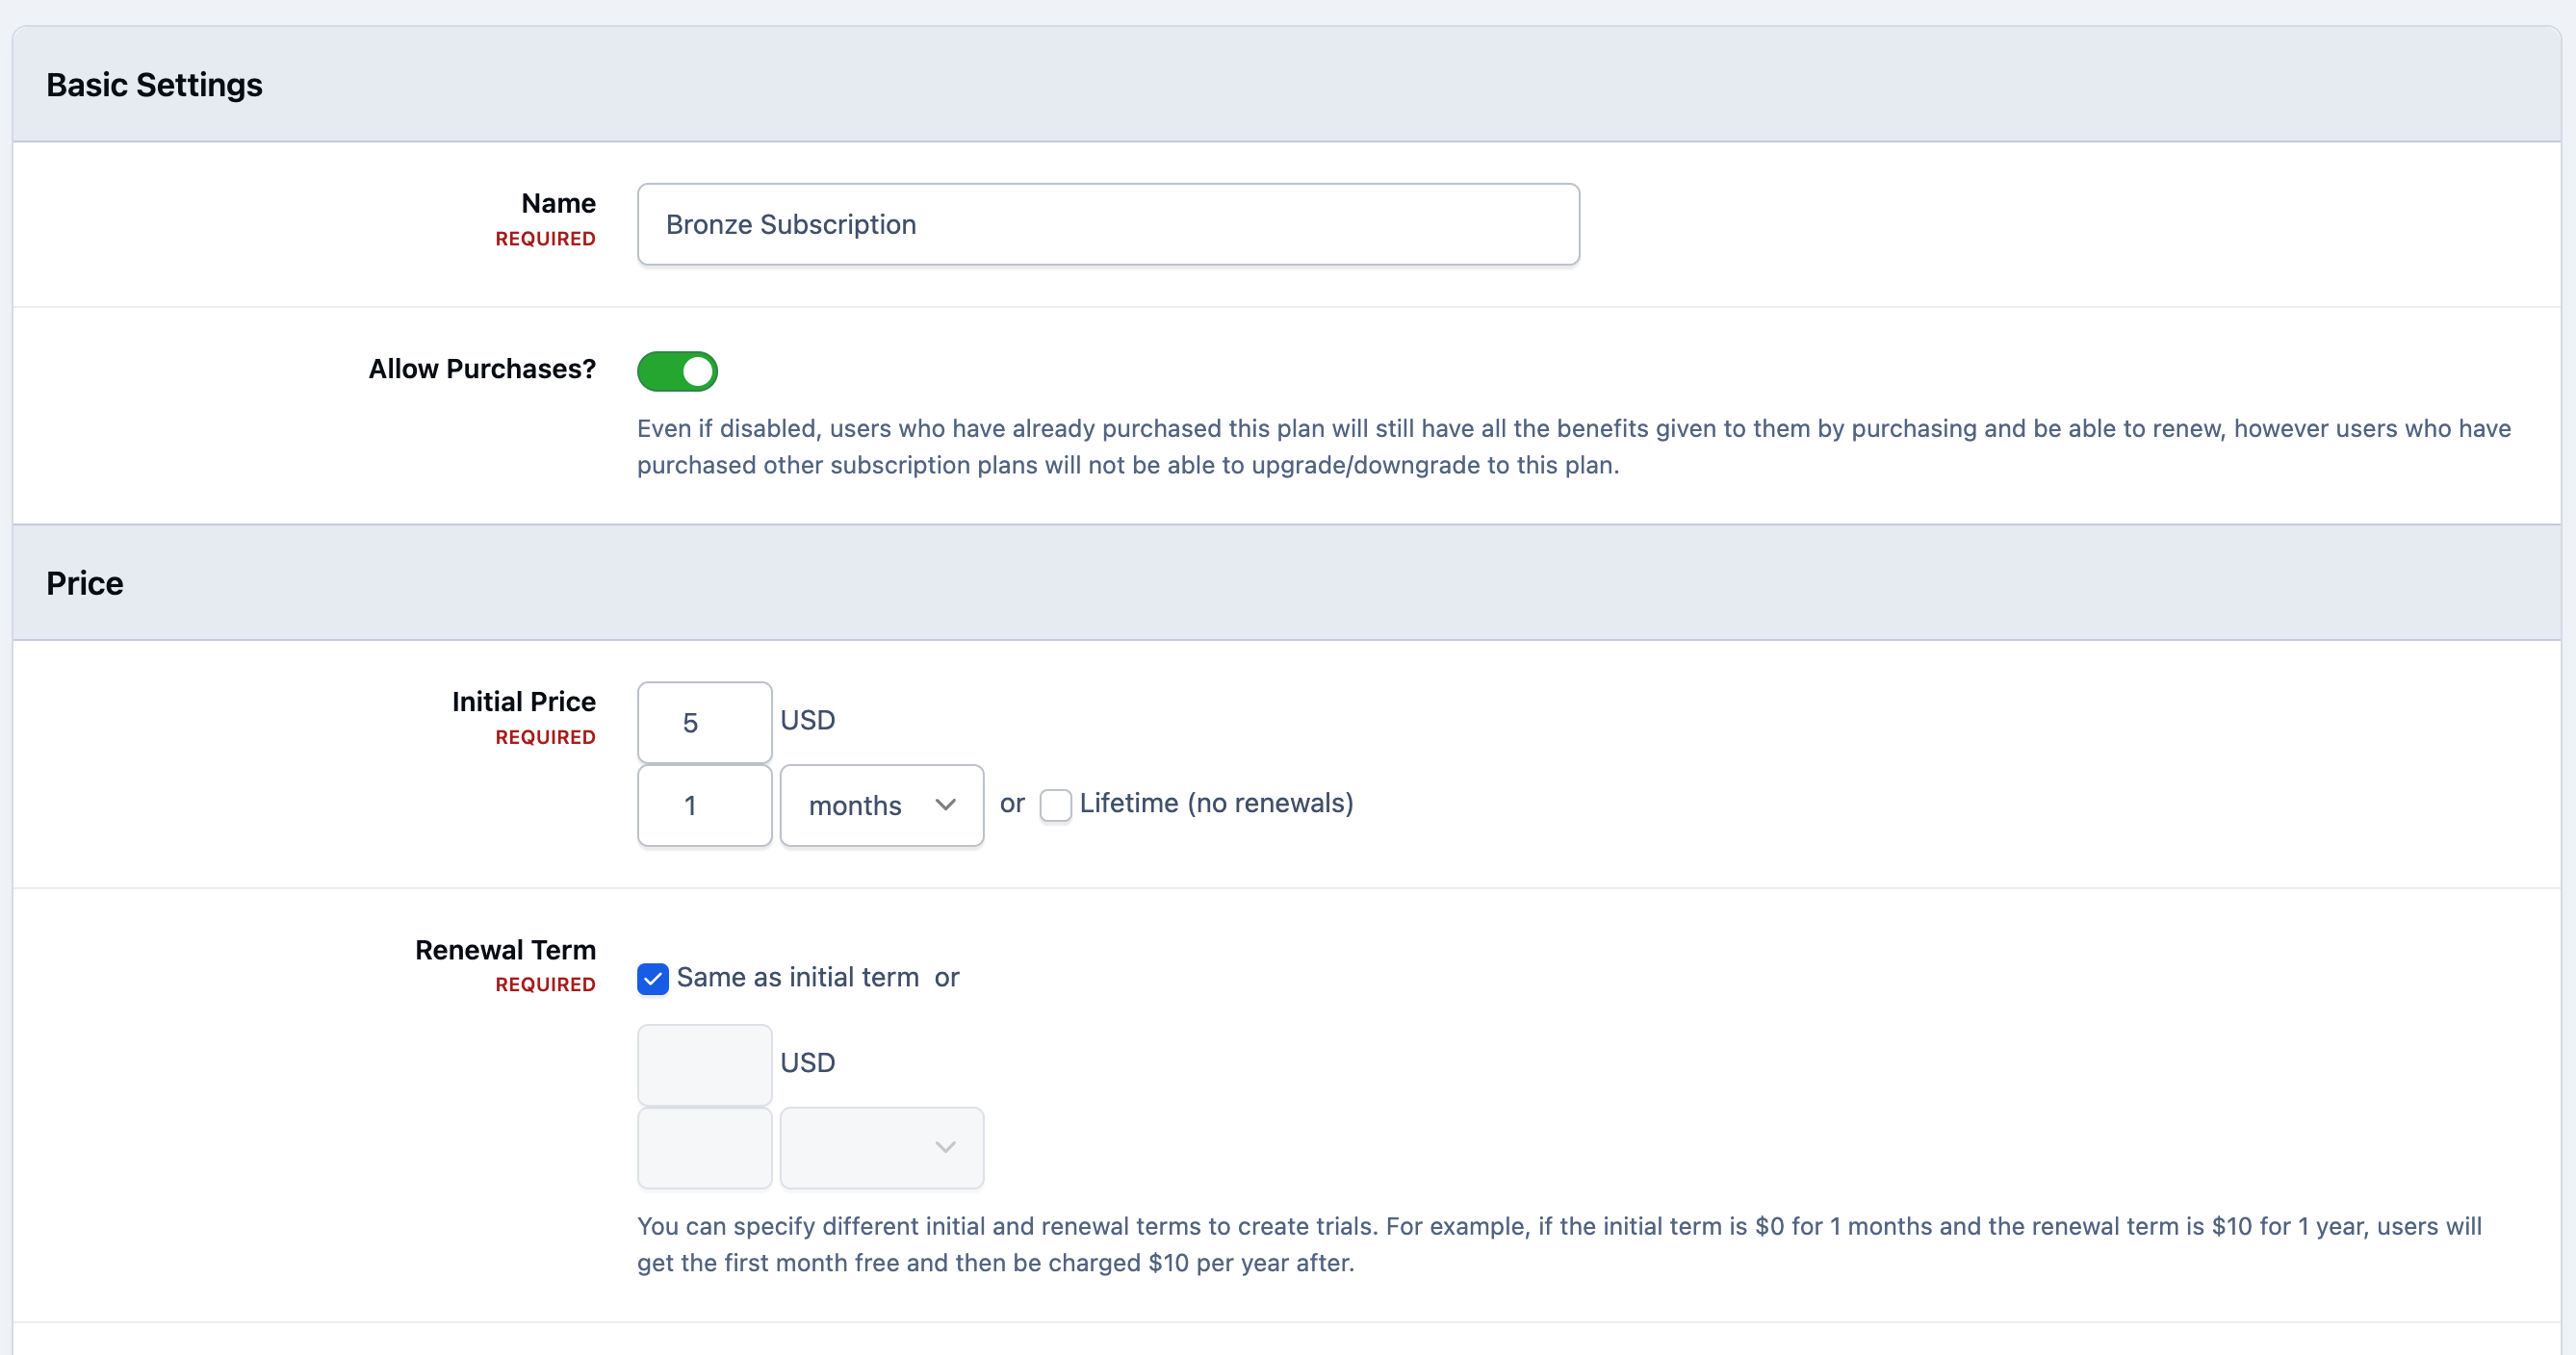
Now that the name and pricing have been configured, the next step is to define what happens when someone purchases this subscription.
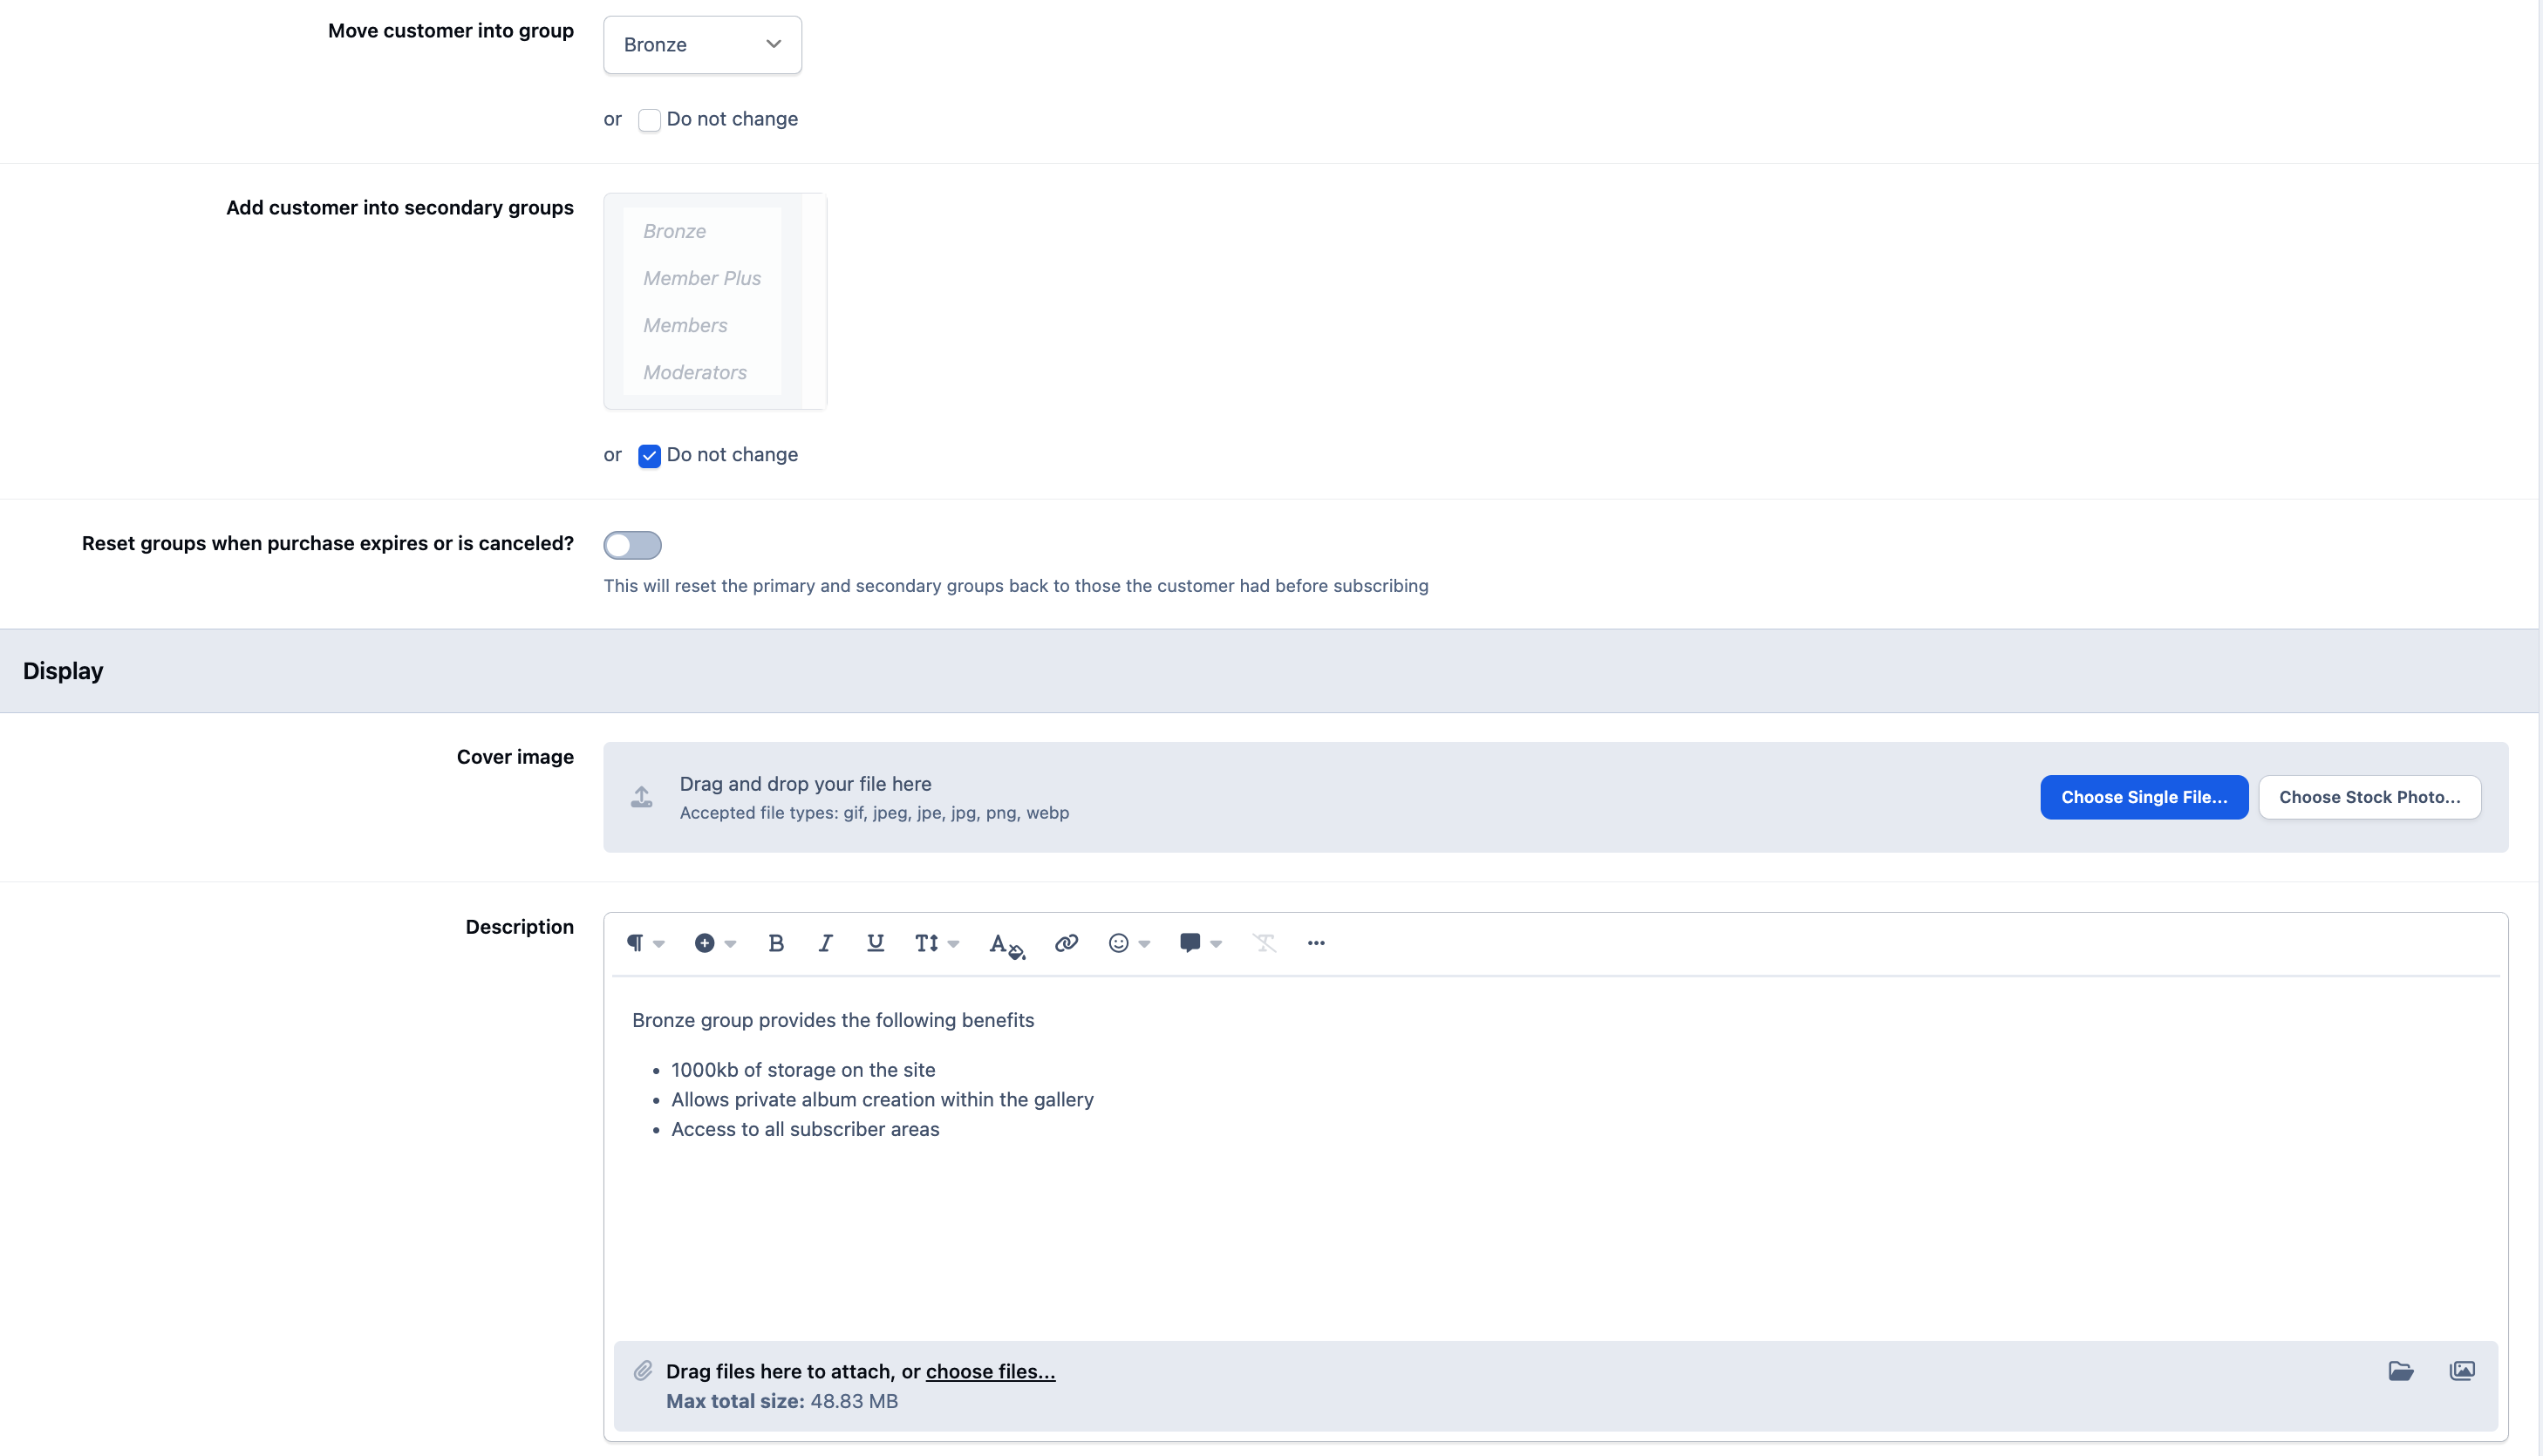
In the subscription settings, choose the option to move the member into the Bronze group upon purchase. This ensures that as soon as payment is completed, the member gains access to the benefits associated with that group.
You should also enable the option to 'move the member back to their original group' if the subscription expires or is cancelled. This automatically removes the benefits if the member stops paying, keeping access in line with their subscription status.
Once that is configured, you can optionally add a cover image and a description to make the subscription more visually appealing and clearly explain the benefits to potential subscribers.
At this point, your subscription setup should reflect:
The subscription name and pricing
Automatic group promotion on purchase
Automatic group reversion on expiry
Optional branding elements such as image and description
Your final setup should now resemble the example shown below.
Benefits Setup
Repeat the same steps to create your Silver and Gold subscription plans. Once finished, you’ll have a complete set of subscription tiers in place.
The subscription system automatically supports upgrading and downgrading between plans, provided this is enabled within the subscription settings. For more detailed information on configuring upgrades, downgrades, and other advanced options, please refer to the full subscriptions guide, which can be found under commerce in the features section of our guides menu.
Recommended Comments